I am trying to apply ceiling plenums through the table view. The model only has one floor, but with multiple roof heights. I imported even flat roofs and extruded spaces up to roofs using ceiling boundary condition of ‘exterior roof’ (previously ‘top exposed’). The geometry seems to preview correctly without plenums, but the plenum depth seems to be extruding down from the highest roof level, resulting in a gap between the occupied space and associated plenum. The floor-to-floor height in the table is listed as the highest roof elevation for all spaces. Does the space floor-to-floor height need to be adjusted manually for each space for the ceiling plenum to locate properly in elevation?
Hi @jacobanderson,  Welcome to the forum.
Thank you for posting this on the forum. Is it possible for you to share a small sample model to recreate this issue? @chriswmackey should be able to help you with explaining the logic for how plenums are calculated for each scenario.
Hi @jacobanderson ,
I am wondering why you did this?
If all of the roofs are flat, was there a reason for using detailed roof geometries? Things will be much simpler and straightforward if you can set each room floor-to-floor height to be the roof height rather than trying to edit detailed roof geometries. Or is there a case where you need the flat roof height to change within a single room and you don’t want to split the room into parts that have the different heights?
If so, I’ll just answer this second question assuming there’s some reason why you need the detailed roof geometry:
The ceiling plenum elevation is always determined through the following calculation:
plenum_elevation = floor_elevation + floor_to_floor_height - ceiling_plenum_depth
So it has nothing to do with the roof geometry when you have a case of sloped roofs. It’s all determined through those 3 properties that you can set on the room. And, while you can use the ceiling plenum depth with models that have sloped roofs, you may have to do some math to make sure that the plenum elevation is set correctly below all of the roof geometry. Also note that, if you set ceiling plenum depth to a value that collides with or is above the sloped roof geometry, you’ll get errors when you validate, meaning that your model geometry will not export correctly. Perhaps this is what you mean when you say:
Thanks for the quick replies. All spaces start at the first floor but have multi-level roofs. Each space only has one roof level (no sub-divided/partial roofs). Since only one roof level can be associated with a floor level when importing, I selected the highest roof level with the hope of using the ‘exterior roof’ boundary condition to limit the extrusion of lower roofs without having to manually edit each lower roof level.
Ok, thanks. The calculation is helpful. The floor_to_floor_height variable is the same for all spaces, even though lower roofs are capping the extrusion. This raises another question that I’ve had (particularly with sloped roof instances) - why wouldn’t the ceiling plenum depth subtract the ceiling height from the floor_to_floor_height elevation? I would presume in most (more?) instances that the floor is flat but that a roof may not. I am not sure of how I would calculate/account for the ceiling plenum volume of a sloped roof, aside from multiple subdivisions of a space? Similar to trying to determine the area under a curve using rectangles (thinking back to integral calculations in calculus  ).
).
Hi @jacobanderson,
It is true that you can only assign one extrusion height to the rooms on the same level when importing the rooms to the Model Editor, but you can edit them quickly after adding them to the Model Editor.
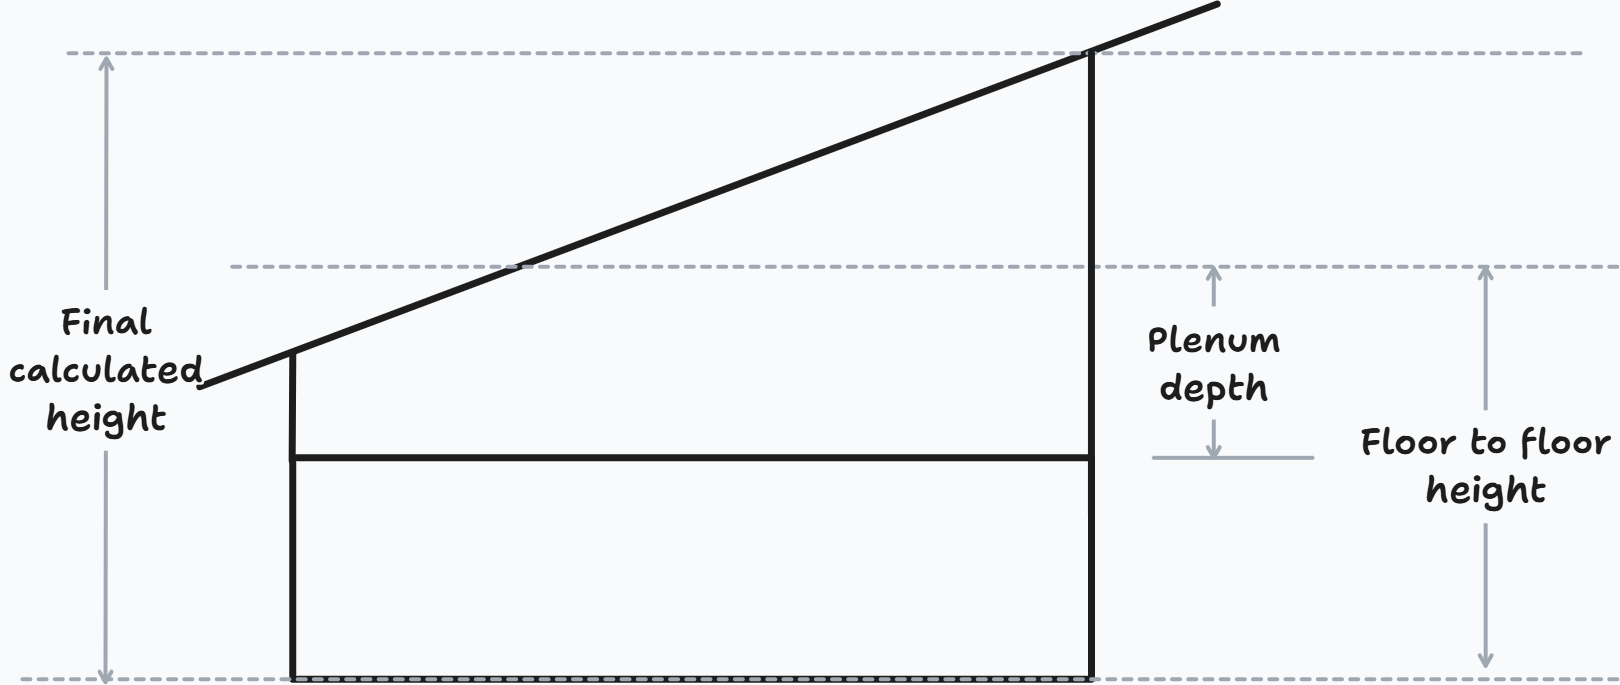
Maybe it will be helpful to clarify the difference between the assigned floor-to-floor height and the final calculated height (that includes the roof). In the case of the formula, we use the assigned floor-to-floor extrusion height and not the final calculated height. The calculation is pretty simple and doesn’t include the roof. Here is a simple diagram that can help.
Here is a simple model that I put together to showcase how you can set up the values. In this example the floor-to-floor height for both rooms is 3 m and the plenum height is 0.3 m. I hope this clarifies the logic.
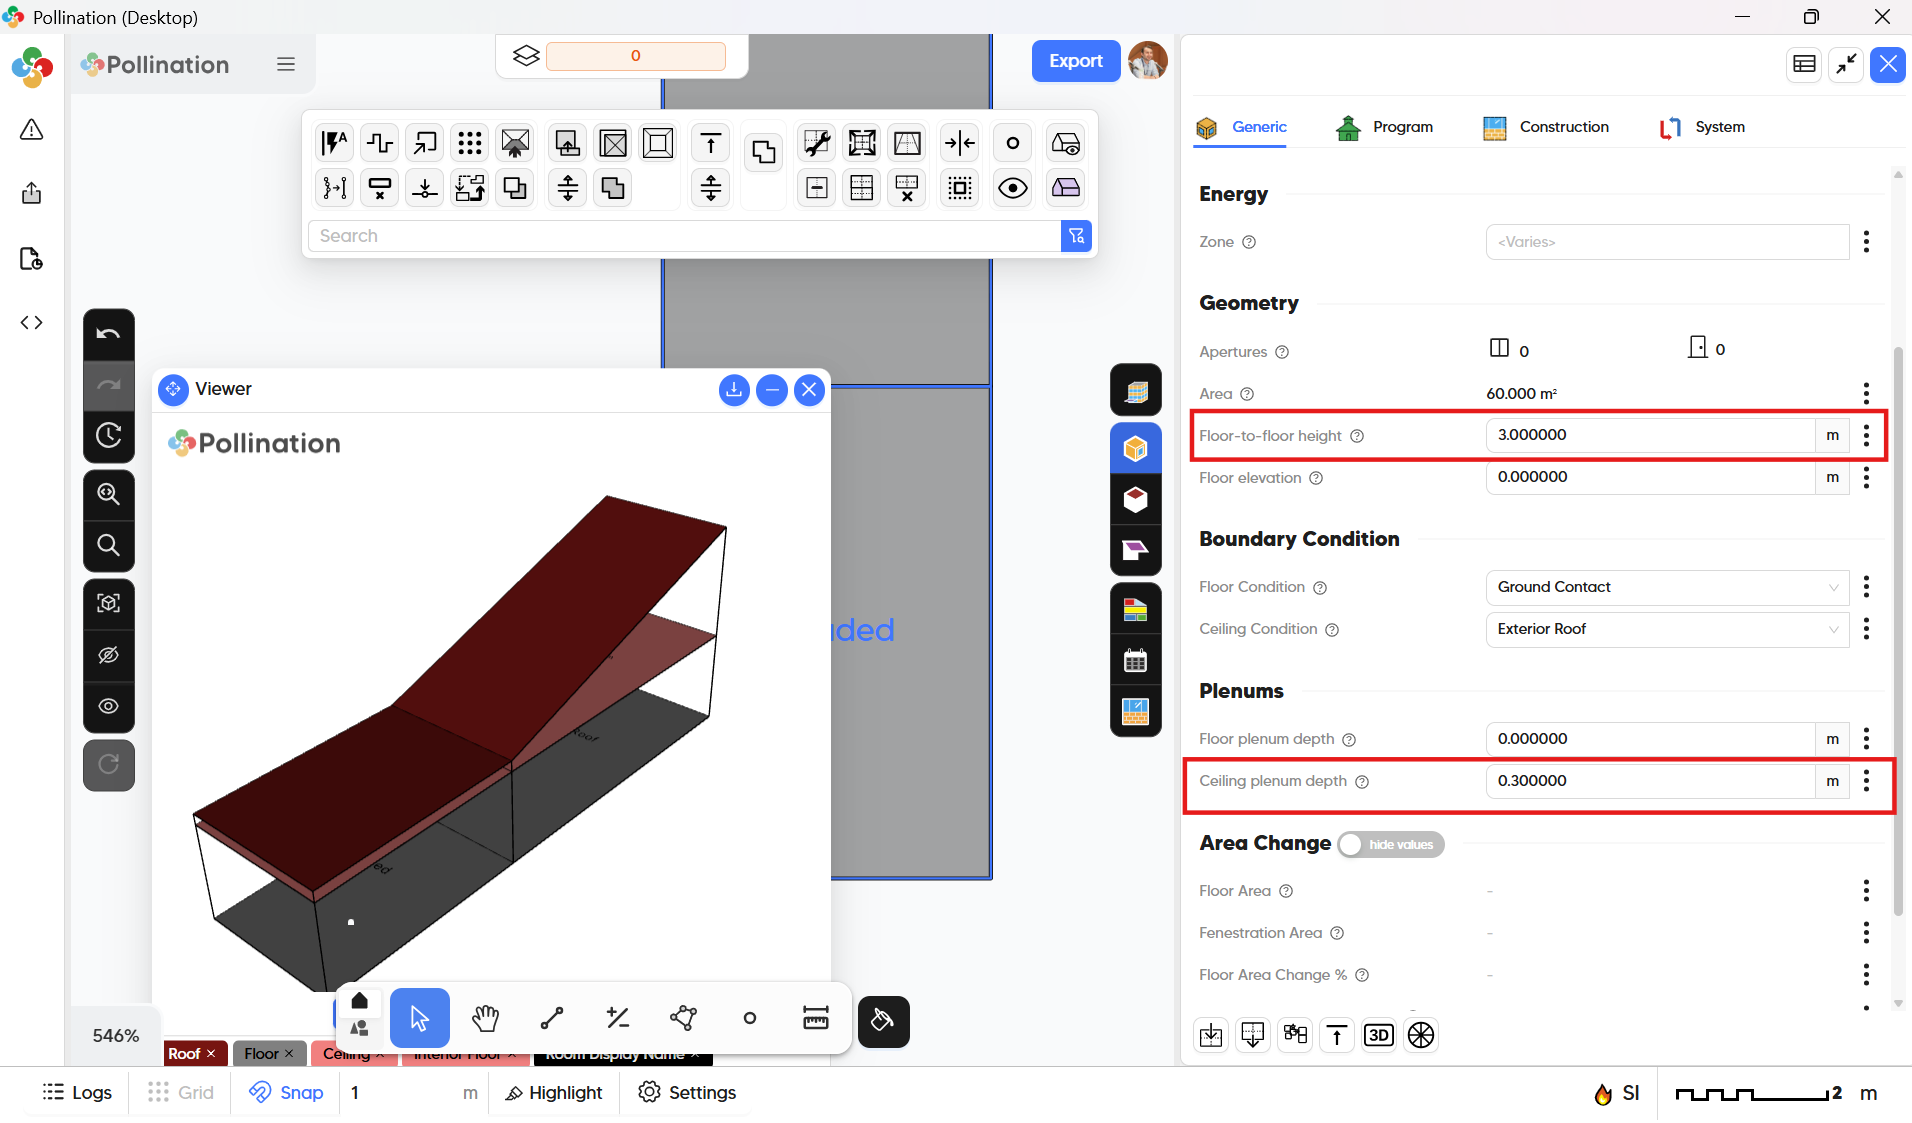
plenum depth example for room with sloped roof.pomf (10.0 KB)
This is not necessary! 
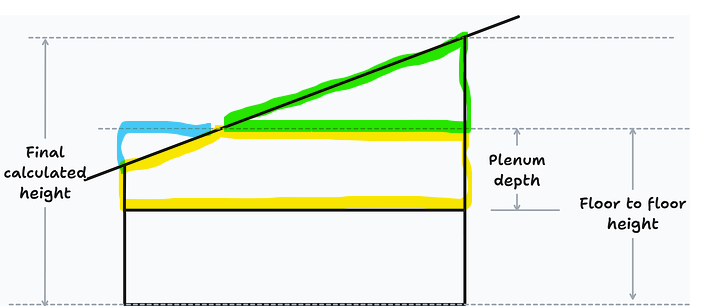
Thanks Mostapha, the graphic helps to confirm my understanding. I presume that the ‘final calculated height’ is not a calculated variable, correct? So if I understand correctly, the plenum volume is calculated using the yellow highlight. How is the volume in green accounted for and is the volume highlighted in teal erroneously included?
Hi @jacobanderson,
Sorry that my chart has been confusing. Pollination uses two different schemas for representing the model. The data is initially stored in a 2D representation. That’s where the values for floor-to-floor height and plenum depth exist. These values are used to calculate the full 3D geometry of the model which can also include sloped roofs. When that calculation runs you get the correct full volume for the plenum. It will be helpful to understand your overall workflow. Do you need to calculate the plenum volume inside the Model Editor? In that case, you have to run a 2D → 3D translation to be able to get the correct values.
Here is a longer explanation:
This is not correct. As you can see in the 3D preview the teal part doesn’t exist when the full 3D room geometry is calculated.
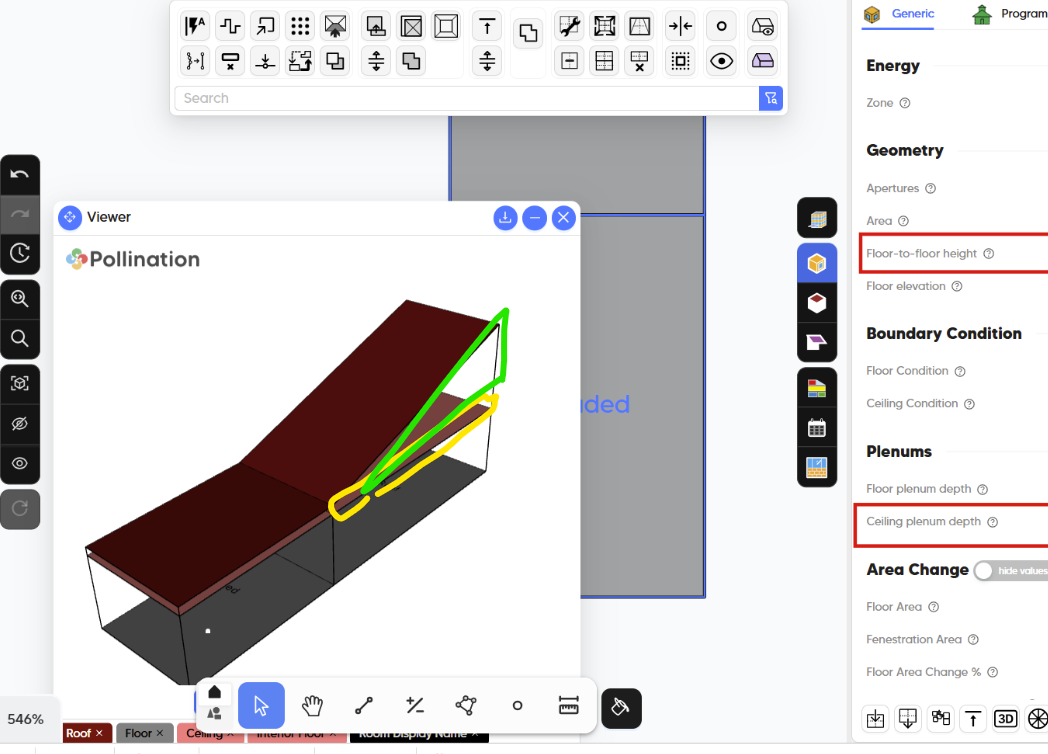
As I mentioned above, when you export the model or generate a preview, we run a 2D → 3D conversion as part of the translation. This translation calculates the final geometry of the room that includes sloped roofs in the model, if any. At this point, you get a full Room 3D that has the final calculated geometry.
The short answer is that the final volume for the plenum is the addition of the yellow and the green segments and doesn’t include the teal part. One way to see this is to export the model to IESVE as a GEM file and open the model there. That will help you to see the final version of the geometry.
Hopefully, this clarifies what I meant by final calculated height. I meant the actual height that is calculated based on the roof geometry and during the translation from a 2D geometry to the full 3D geometry.
We do not need to calculate the plenum volume within the Model Editor. Visual confirmation in a model preview (ideally) or after export (worst case) is fine.
So to ensure accurate plenum volume representation, should the floor-to-floor height (or top associated level in Revit) be the ‘final calculated height’ and the volume is capped by the roofline, or does it not matter? Is there a preferred/recommended workflow for best results? In the example you provided, it seemed to not matter and that the ‘top’ of the plenum depth lands in the middle of the plenum.
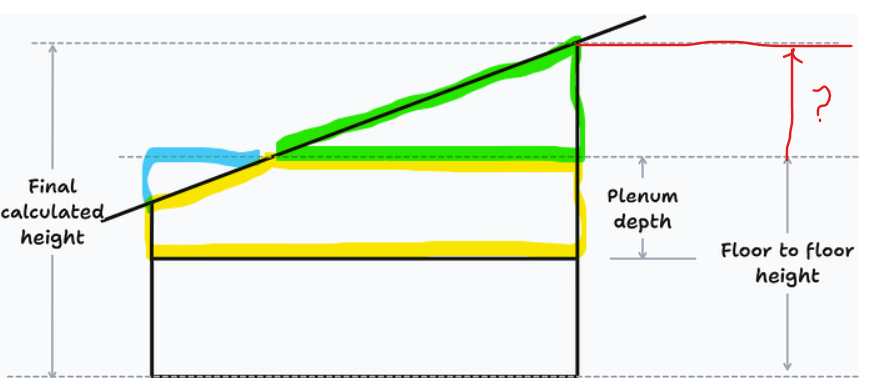
It feels like we made this discussion much more complicated than what was needed for your case, @jacobanderson, since we established that you do not have a need to import roof geometries from Revit.
For your case, I recommend deleting all roofs from your model and then just set the floor-to-floor height of the room correctly using the workflow you see at this timestamp here in @mostapha 's tutorial video:

Then, you don’t have to worry about anything in this diagram that we are marking up. Just get the room’s height correct (overriding the value that you set when you imported them from Revit). Then set the plenum depth and everything should look visually correct in the 3D preview and exported models.
If you want help with this, please send us the POMF either on this thread or over private message and I’ll record a video with your model.
@chriswmackey , thank you - yes I am aware of the video provided on modeling ceiling plenums and following that guidance. I agree with you on this specific instance on deleting the flat roofs and manually changing the floor-to-floor height for each space, which seems to be working correctly.
I am clear on flat roof. Regarding slope roofs:
Ah, sorry for realizing that we had moved on from the initial model and you were asking more generally for cases of sloped roofs.
To answer your question, the room floor-to-floor height generally does not matter when you have the room being shaped by sloped roofs. The only time where the floor-to-floor height comes into play for a room with sloped roofs is in the computation of a ceiling plenum’s elevation. So you can set the room’s floor-to-floor height to be any number that makes the math of the plenum elevation easy for you to understand.
If you know what the final calculated height is with the sloped roof, then you might as well set the room’s floor-to-floor height to that since it probably makes the ceiling plenum depth easier for you to figure out and imagine spatially. But there’s no requirement to do this if you don’t know what the final calculated height is for a given room. The only requirement is that the ceiling plenum’s elevation has to be below all sloped roof elements.
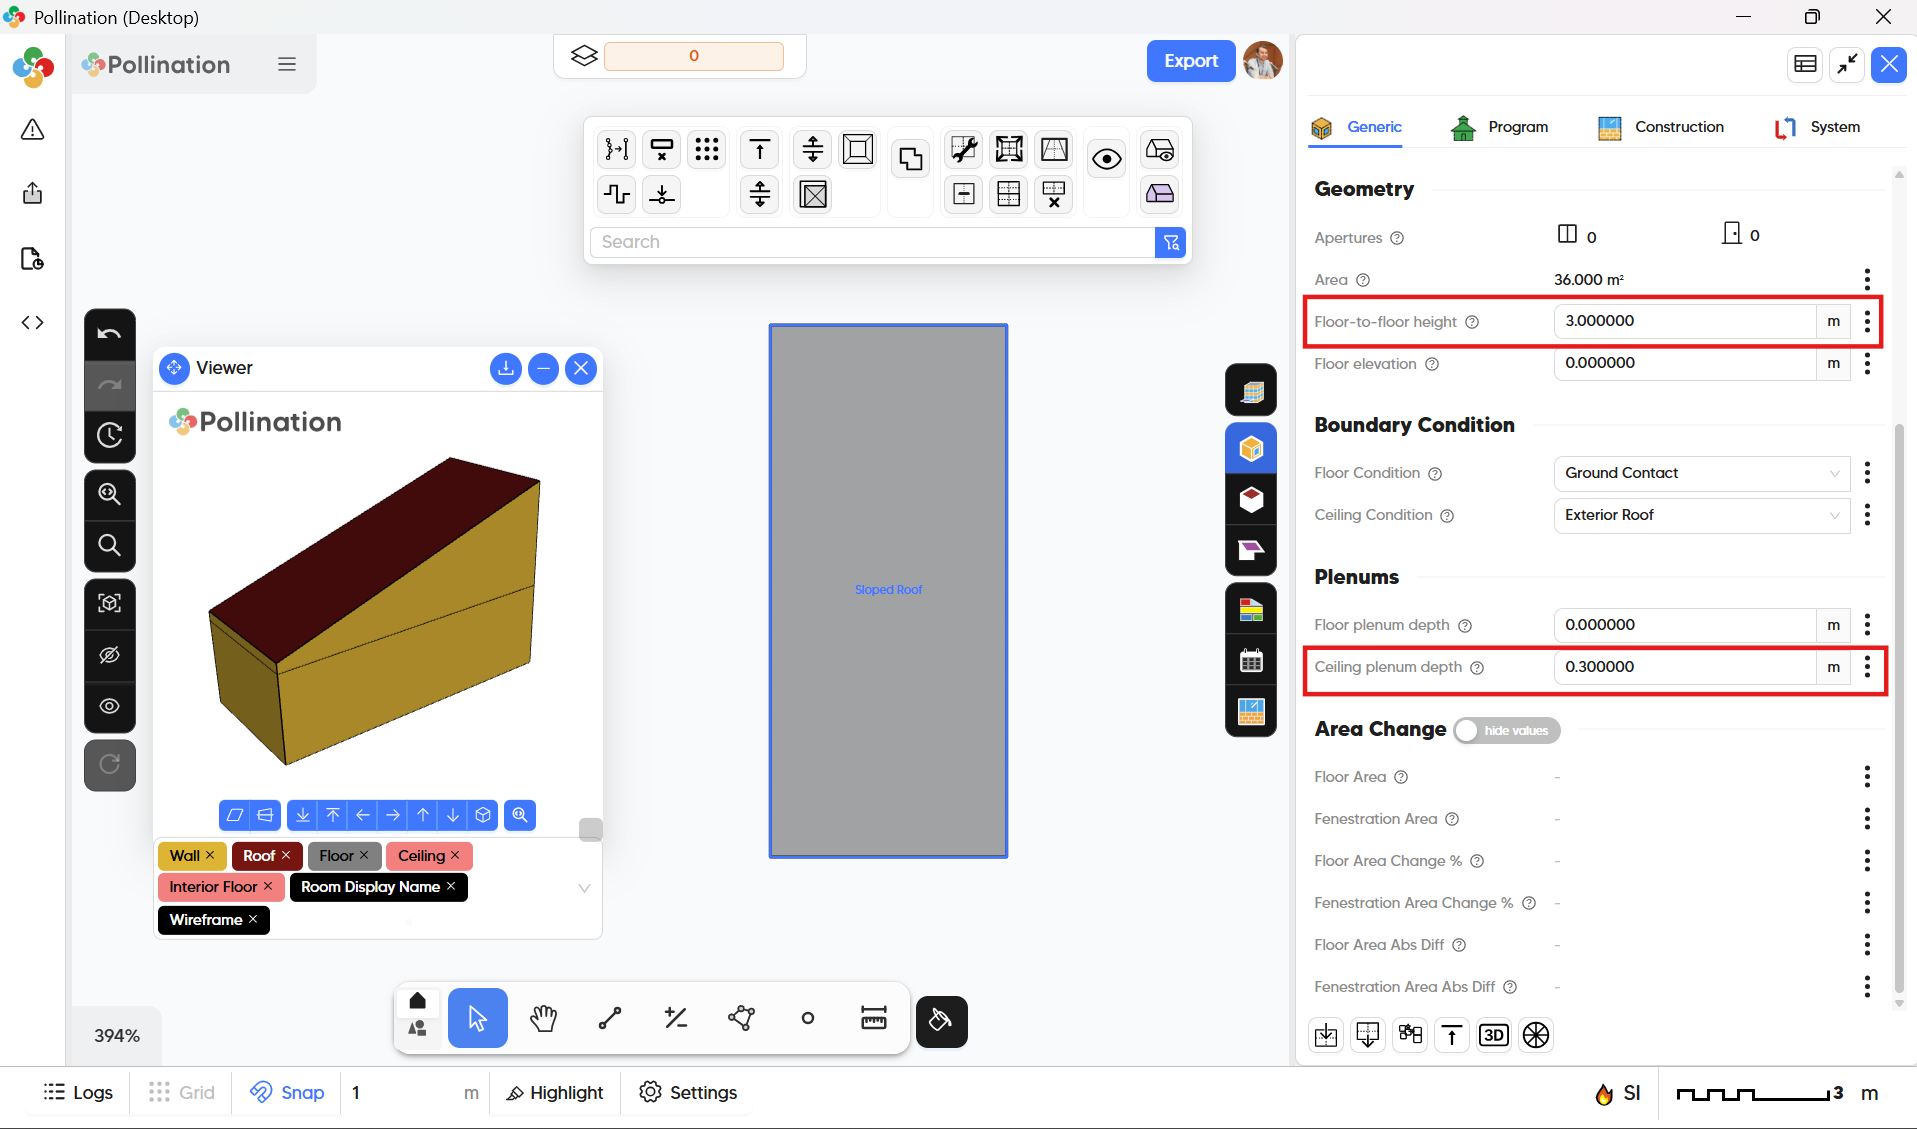
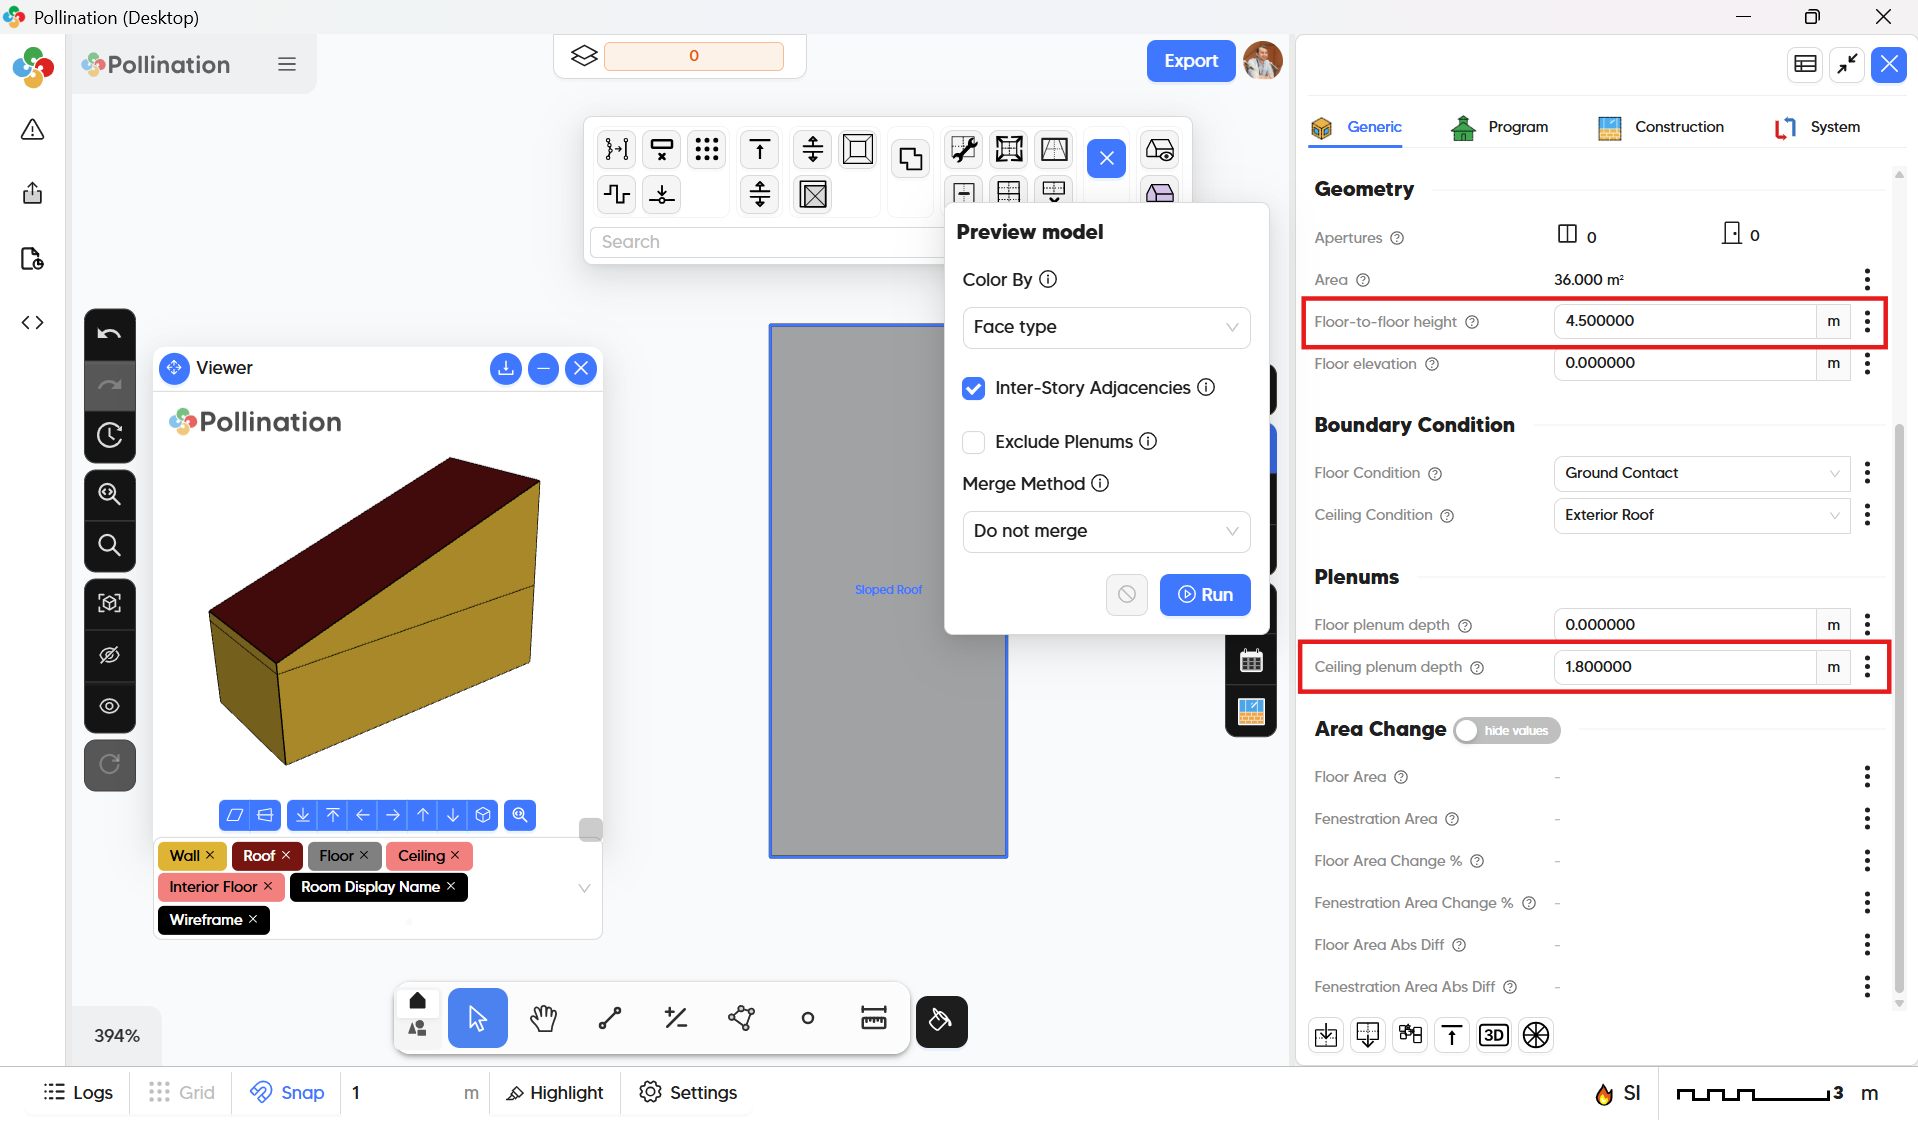
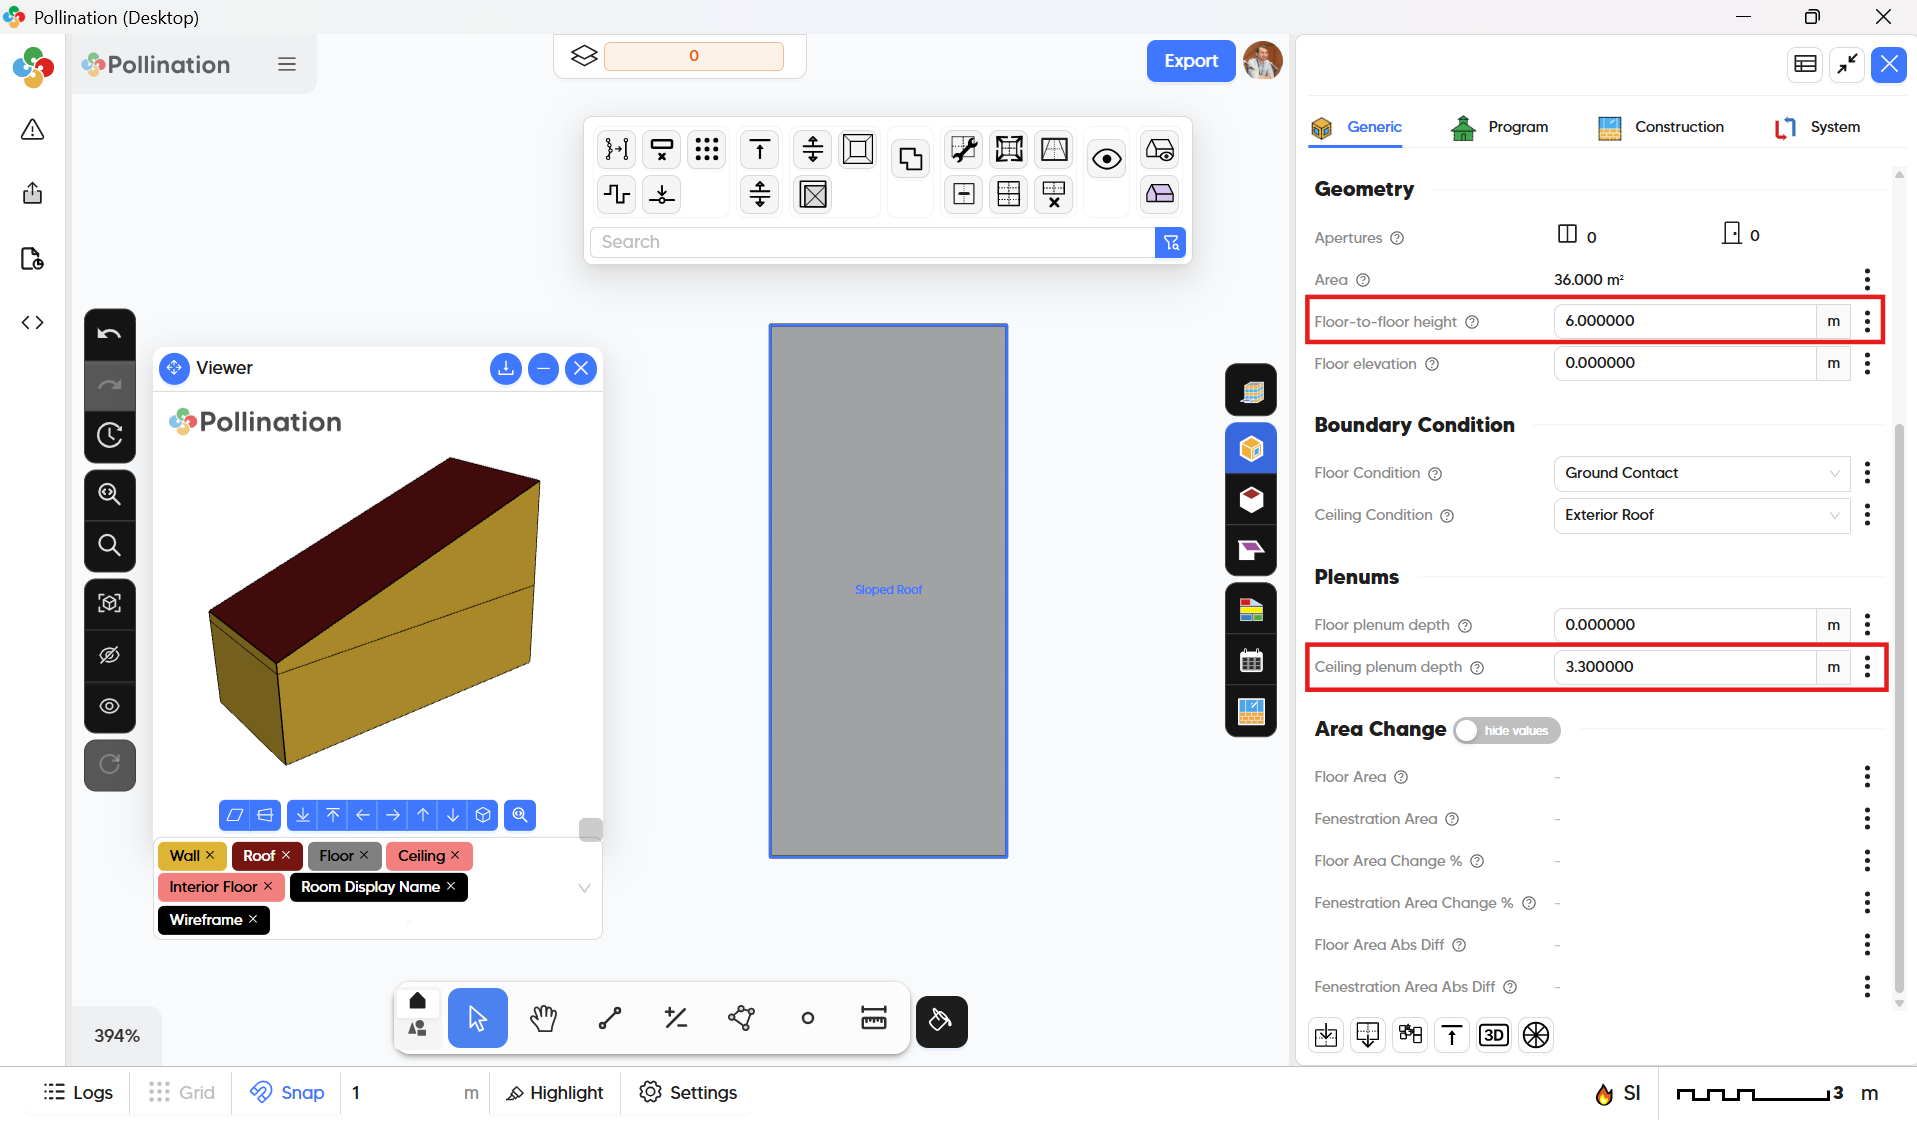
Thank you, @chriswmackey! For future reference here are some screenshots which basically shows what you said above.
Here I’m using 3 different floor-to-floor height that shows how the result will be the same as long as the ceiling depth is adjusted in relation to the floor-to-floor height value.
Thank you @mostapha and @chriswmackey for your assistance and time you took for the explanations. This clears up my concerns for now.
Hi @jacobanderson, my pleasure! Let us know if you have any other questions. Have a great weekend.
You’re very welcome, @jacobanderson . I am unassigning myself from this topic now that we have marked a solution but just let me know if you have any other questions and I can add myself back.