Pollination model export as IESVE gem behaving differently to the DUMP gem grasshopper component

Hi all,

I’ve got a question around how windows / apertures are handled when exporting Honeybee rooms to IESVE via Pollination, specifically in the case where a wall is effectively 100% aperture.

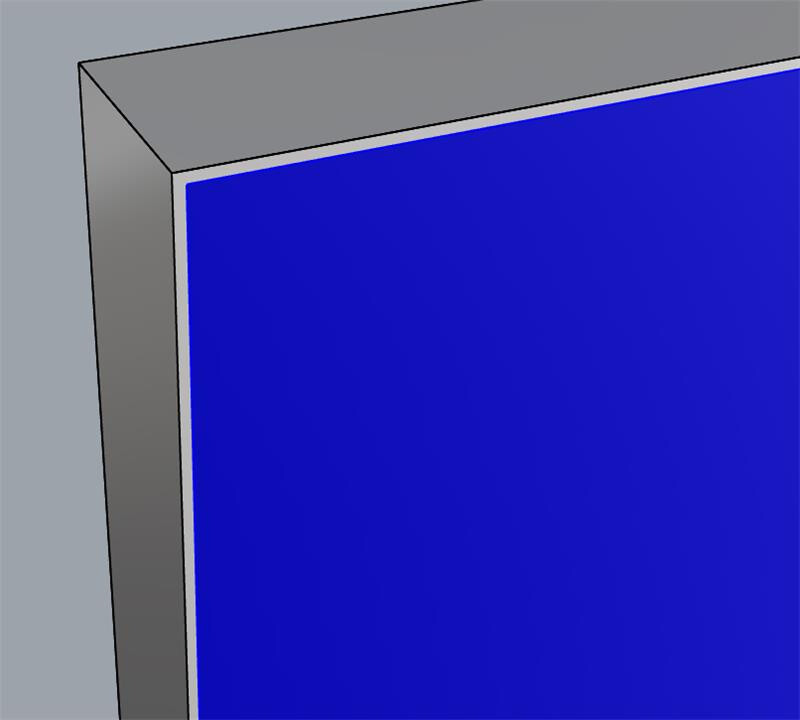
As we know, the Add Subface component won’t correctly add apertures when the aperture ratio is 100%, which makes this a bit awkward.

What I’m trying to do instead is a workaround that some IES users may recognise:

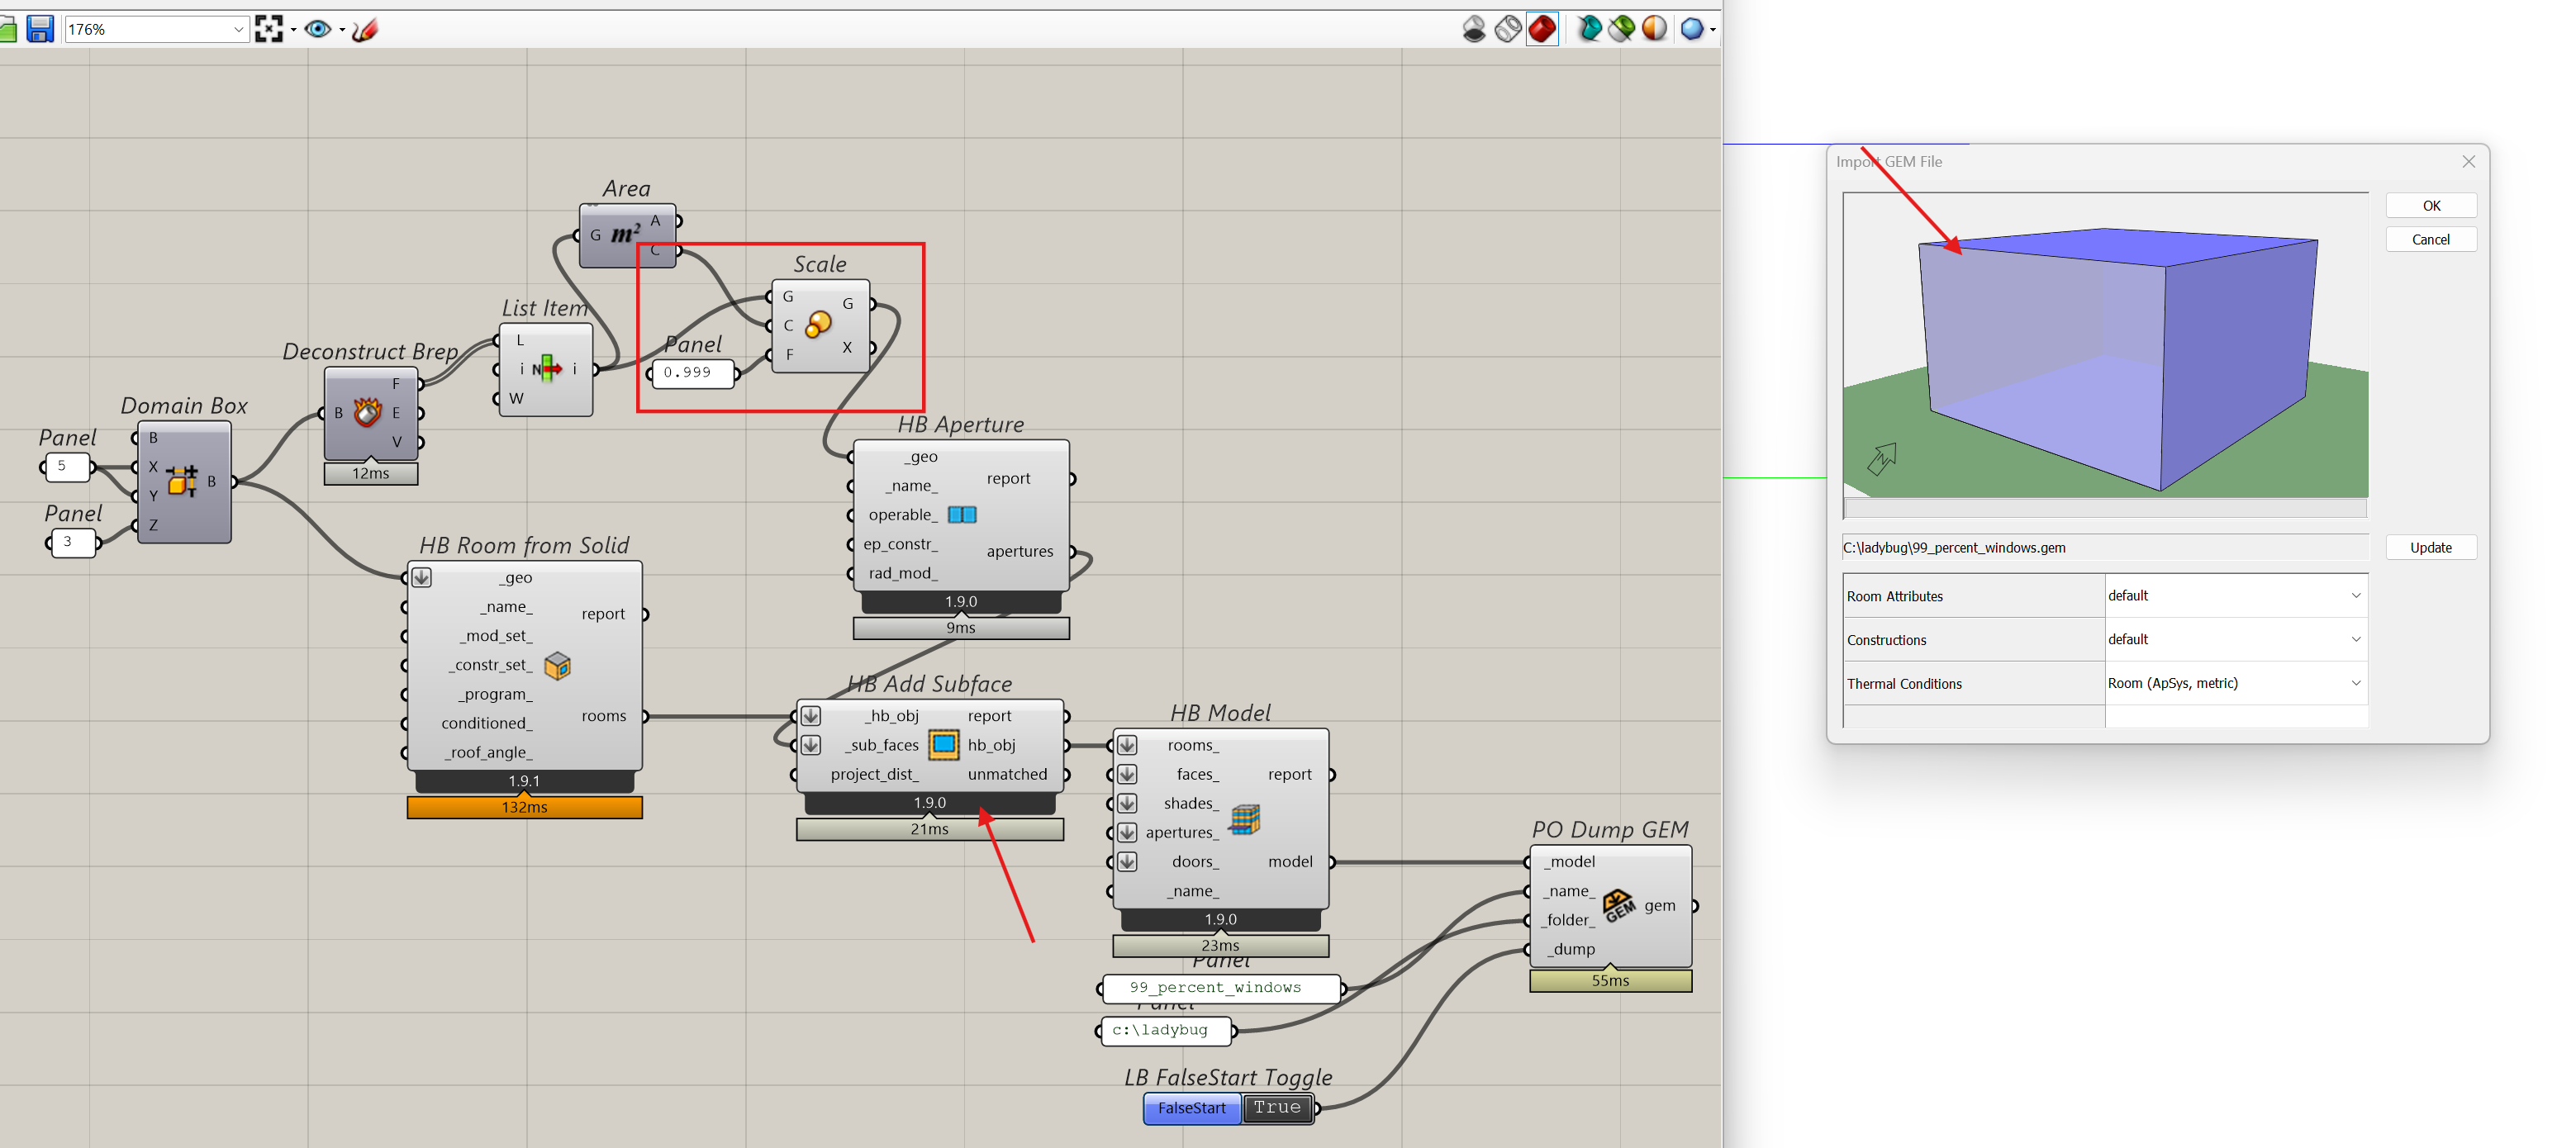
  • Create dummy rooms/zones where one wall of the dummy box is fully replaced by a single aperture that fills the entire face.
  • Export those dummy zones to IESVE so that the aperture is imprinted onto the corresponding real zones that already exist in IES.
  • Then delete the dummy zones in IES, leaving the apertures correctly applied to the real zones.

This hack works well on the IES side.

The problem I’m hitting is on the Grasshopper / Pollination side:

  • I can’t construct a Honeybee model for these dummy zones that includes a 100% aperture wall.
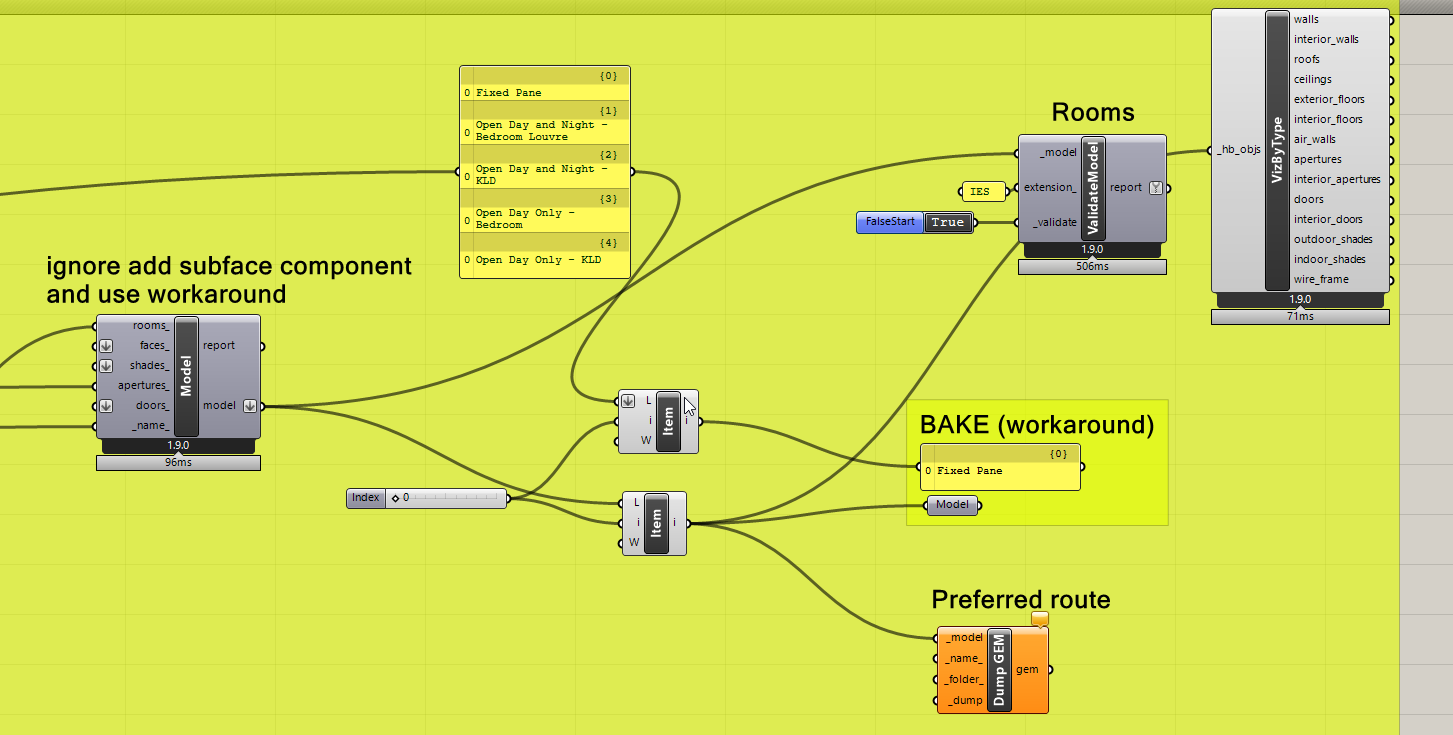
  • Because of that, I can’t use the Dump GEM component to automate this process for multiple batch groups.
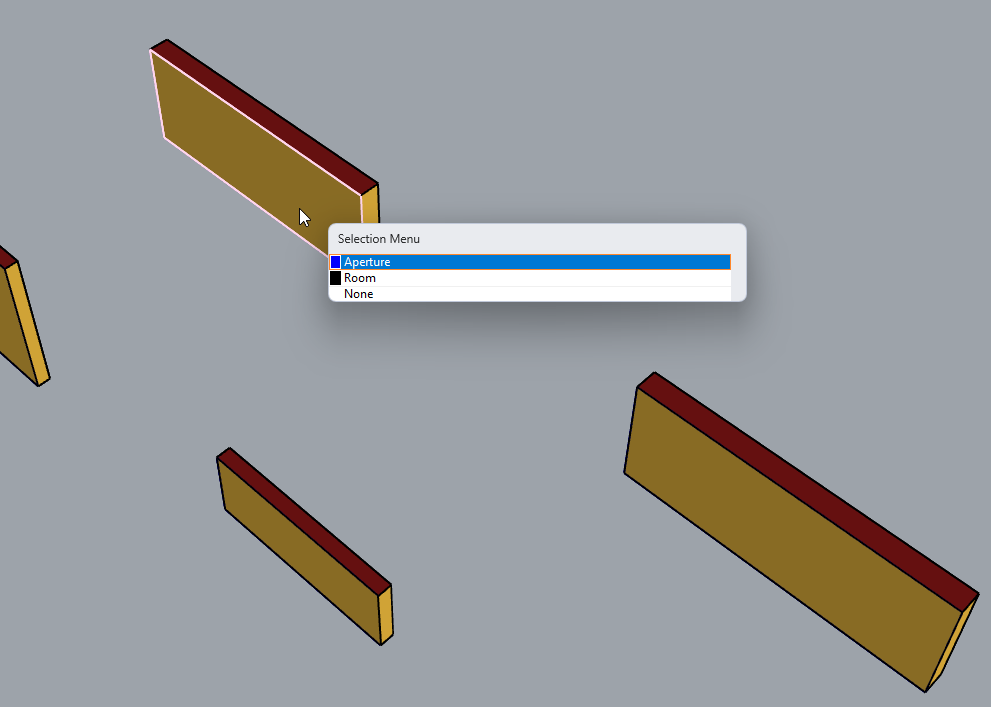
  • A workaround I’ve found is to manually bake these inton rhino then create the dummy rooms directly in Rhino, add apertures using the pollination tools, and then use Select → Export → IESVE GEM. This exports correctly and behaves exactly as intended in IES.
  • However, this approach is manual and doesn’t scale — ideally I want to generate and export these dummy zones parametrically via Grasshopper so they can be batch-processed alongside the rest of the model.

So my question:

  • is there a way to coerce Honeybee into exporting a full-face aperture via Dump GEM via grasshopper?

Thanks!


Hi @milog,

Interesting problem and even more interesting workaround. This is one of those cases that is not a bug and actually a feature.

The rule 3 of the 5 Golden Rules of Honeybee Schema Geometry enforces this behavior:

All children sub-faces (Apertures and Doors) must be co-planar with their parent Face and lie completely within its boundary.

That’s why the windows need to be smaller than the parent face. You should be able to try to create a windows that covers 99.9% or the area assuming that 0.1% difference provides a large enough gap that is larges than the tolerance which should technically do what you need. I gave it a try here:

add_99_percent_window.gh (32.0 KB)

Hi Mostapha, thanks for getting back to me. My main question was why is it possible to export with 100% area when doing it via rhino pollination (convert polysrf to room > add aperture as 100% of wall) > export to IESVE gem. But not when doing it via the dump gem component in grasshopper?

1 Like

Technically, that is probably a bug in the Rhino plugin. Or maybe, another explanation is that the Rhino plugin is more forgiving and allows you create invalid models. :slight_smile:

@chriswmackey, what is your take on this? This is one of those cases that made total sense when we were mainly exporting the model to EnergyPlus but now, with the introduction of IESVE, the requirements are different. Is it something that we could be more flexible about and consider an “EnergyPlus” specific validation error? Or that is not possible because this will change many of the builtin geometry utilities?

I wonder if we could treat this like small segments that we automatically remove when exporting the models to EnergyPlus. In other words, we allow the faces to be fully glazed, and offset move the edges inwards by the tolerance value to meet the EnergyPlus requirements at runtime.

Or can we provide @milog with an edited version of the component that they could use for this specific use case of making a fully glazed face? This is probably a better option which should get the work done without introducing a possibly high risk change.

Hey @milog ,

The short answer is that the Grasshopper plugin just has extra checks to ensure that you can’t add Apertures with areas that approach that of the parent Face while the Rhino plugin does not (though maybe it should as @mostapha mentioned).

Please understand that we would be getting a lot of bug reports if we did not have a check like this in Grasshopper because EnergyPlus throws fatal errors when the area of the window exceeds that of the parent Face within floating point tolerance, which is likely to happen for some of these cases where the Aperture and Face seem perfectly equal but maybe the coordinate values are are slightly different by 10e-12 or something like that. Given that most users of the Grasshopper plugin are still going off to OpenStudio/EnergyPlus, we need to take them into account in the design of the components.

So I really would not want to change the behavior of the official Grasshopper component but you could add this type of 100% Aperture in Grasshopper if you did it inside of a custom GHPython component. Here is some sample code for the component that should work (more or less as long as you’re not using it on concave wall faces or something like that):

rooms = [r.duplicate() for r in _rooms]
for ap in _apertures:
    for room in rooms:
        for face in room:
            if face.geometry.is_point_on_face(ap.geometry.center):
                face.add_aperture(ap)

The sample code works pretty much the same as the “HB Add Subface” component except is uses _rooms and _apertures. Granted, you’ll still get pollination validation errors with this type of model but, from what you said, @milog it sounds like IESVE has no problems with this type of 100% geometry.

So hopefully that unblocks you for now.

Now that we have the validation separated for each engine, this is certainly something that we can consider. Making sure that users don’t get the “Invalid Subfaces” validation error for this 100% glazed case when they select “ISEVE” as the destination engine is certainly doable.

It would just be nice to have a bit of a better understanding of what IESVE’s limitations actually are before we change the validation routine. For example, is it true that IESVE won’t give you an error at all if the area of the window is significantly larger than the parent Face? Or is there some kind of auto-correction that happens for this case upon importing the GEM such that we can really make the windows as big as we want? If so, I can just remove this validation check completely from the IESVE validation. Otherwise, maybe we still want to keep some kind of check there and w just won’t make it as strict as the EnergyPlus one.

This one is a lot more complex to do reliably. Like the validation error above, we would have to just understand what exactly are the cases that we want to support. Is it only the case that there is a single window that completely fills a convex wall face or are there other related cases that we want to permit and then do some type of auto-correction operation?

Thanks Chris, that all makes perfect sense.

To answer your question here “It would just be nice to have a bit of a better understanding of what IESVE’s limitations actually are before we change the validation routine. For example, is it true that IESVE won’t give you an error at all if the area of the window is significantly larger than the parent Face? Or is there some kind of auto-correction that happens for this case upon importing the GEM such that we can really make the windows as big as we want?” - IES actually has a tool inside the software that allows you to convert faces to 100% window, it is one of the window drawing drop down options - 1) draw a rectangle, 2) stamp tool, or 3) 100% there may be others, I cant remember from memory. I also did a test importing a gem which contains a simple box drawn in IES with one of the walls set as 100% window, I then imported this into Rhino (import file > .gem > validate pollination room), and I noticed the window is automatically scaled (or offset?), I imagine this is baked into the code somewhere which handles the import of gems using rhino pollination plugin.

.

I’m not sure what would happen if you tried importing a gem where the window was actually larger than the host surface though…

Yes, it is here:

It is being offset by the 5 times model tolerance, which is probably 5mm for most cases but it could be much more if people use a model tolerance of 1 cm.

I don’t know how we landed on MODEL_TOLERANCE * 5 three years ago. If I had to pick something that I could easily explain to my future self, I would just stick with offsetting by the model tolerance itself (or maybe 1.5 times the tolerance if I needed to be sure that I had a number larger than the tolerance). This way the offset would be as unnoticeable as possible while still enabling the “punched geometry” visualizations that people would get in Rhino and our 3D viewer to look correct (something that can happen when the window and parent geometries are equal).

How do you feel about changing that offset value, @mostapha ?

With this in mind, we could probably just come up with an official standard for how we handle translation of Apertures touching the edges of the parent face when going to/from GEM. Something like "if the Aperture vertex is within 2x Model tolerance of the parent edge, it automatically gets snapped to that edge during GEM export. And, when the GEM is imported back, the edges automatically get offset by 1.5x the tolerance. Some convention like this is probably going to be the least disruptive to our workflows rather than implementing a whole new validation standard for IESVE.

1 Like

I’m in favor of changing it and providing a way to try to support windows that touch the edges of the parent face. Now that we support export to IESVE, and we have heard this from the IESVE users several times, I think we should try to implement it.

We currently have a similar logic for AirWalls/Holes when exporting them to IESVE. If the area is larger than a certain threshold then we make the whole face as a hole. I realized this is closer to what the user expects and is valid (and most likely the better approach) in IESVE.

1 Like

Thanks for confirming, @mostapha .

I put the implementation of a standard way to handle import/export of these types of geometries on my agenda. But, the more that I think about it, it might be more effective to enforce this when we eventually refactor the IESVE translators rather than trying to patch this now and potentially missing certain geometry cases.

@milog ,

Do you think the sample code that I gave you above to put into a custom GHPython component could tide you over until we eventually clean up and refactor our IESVE translators?

Hi Chris, I’m sure I can make use of that snippet you sent through, thank you!

On another note, I was contemplating sending through quite a detailed description of the current TM59 workflow we are using on our projects now, it is a sort of IES-Rhino hybrid workflow, aiming to use Rhino for the geometry modelling and IES as the engine. Before spending the writing this post on this thread, I am just wondering if this information would be useful to you and your team, and if so, are there any particular aspects you would like me to describe in more detail?

Let me know.

Milo.

1 Like

Thank, @milog ,

We are definitely interested in understanding your current TM59 workflow and please put together a post about it. At a minimum, it will help us understand whether there are any changes we can make on our end to improve your quality of life with this workflow.

I also forgot to tell you that I was randomly mulling over the problem of how to use simplified E+ ventilation objects for TM59 compliance per our original discussion here and I think I might have found a better way of doing it. In our original discussion, I had given up on using the EMS to control the simple ventilation objects because (at the time) the only place I had found where I could place an EMS actuator was on the total ventilation flow rate, which would have ignored the effects of temperate, wind, etc. that we want to capture for natural ventilation. However, I forgot that these simple ventilation objects also support an “Opening area fractional schedule” and any E+ schedule can have an EMS actuator placed on it to set the exact value of the schedule. This means that I can write an EMS program to control the window opening, which effectively accounts for all of the TM59 logic (including the pesky chance in criteria that happens between day and night).

Long story short, if you start a new discussion and lay out your full workflow, I might be able to respond with something that lets you use the Rhino plugin and Ladybug Tools for everything.

2 Likes