Hello ![]() community,
community,
We’ve spent the last several months rebuilding the Pollination Revit plugin from the ground up. I’ve been fortunate to help build products people love in the past, but this rebuild was easily the most complex and collaborative effort I’ve ever been part of. It was a pursuit of making a truly lovable product through relentless iteration. I know ‘lovable’ and ‘Revit’ don’t usually live in the same sentence, but I hope this plugin earns its right as an exception.
Today, just in time for SimBuild 2026 workshops, we are officially releasing a version our team is truly proud of. To me, beyond the speed and workflow improvements, the most important change is how forgiving the plugin has become.
You have probably heard me say we build the Revit plugin for the messiness of real-world projects where mistakes happen. That’s why we prioritized a forgiving workflow; one that lets you correct mistakes and handle changes without the fear of losing progress or redoing your work. I am genuinely proud of that.
Under the Hood
A three-part architecture is the engine behind the “forgiving” workflow I mentioned above. It starts with the Pollination Tab in Revit, which communicates through our new Revit Connector to the Model Editor.
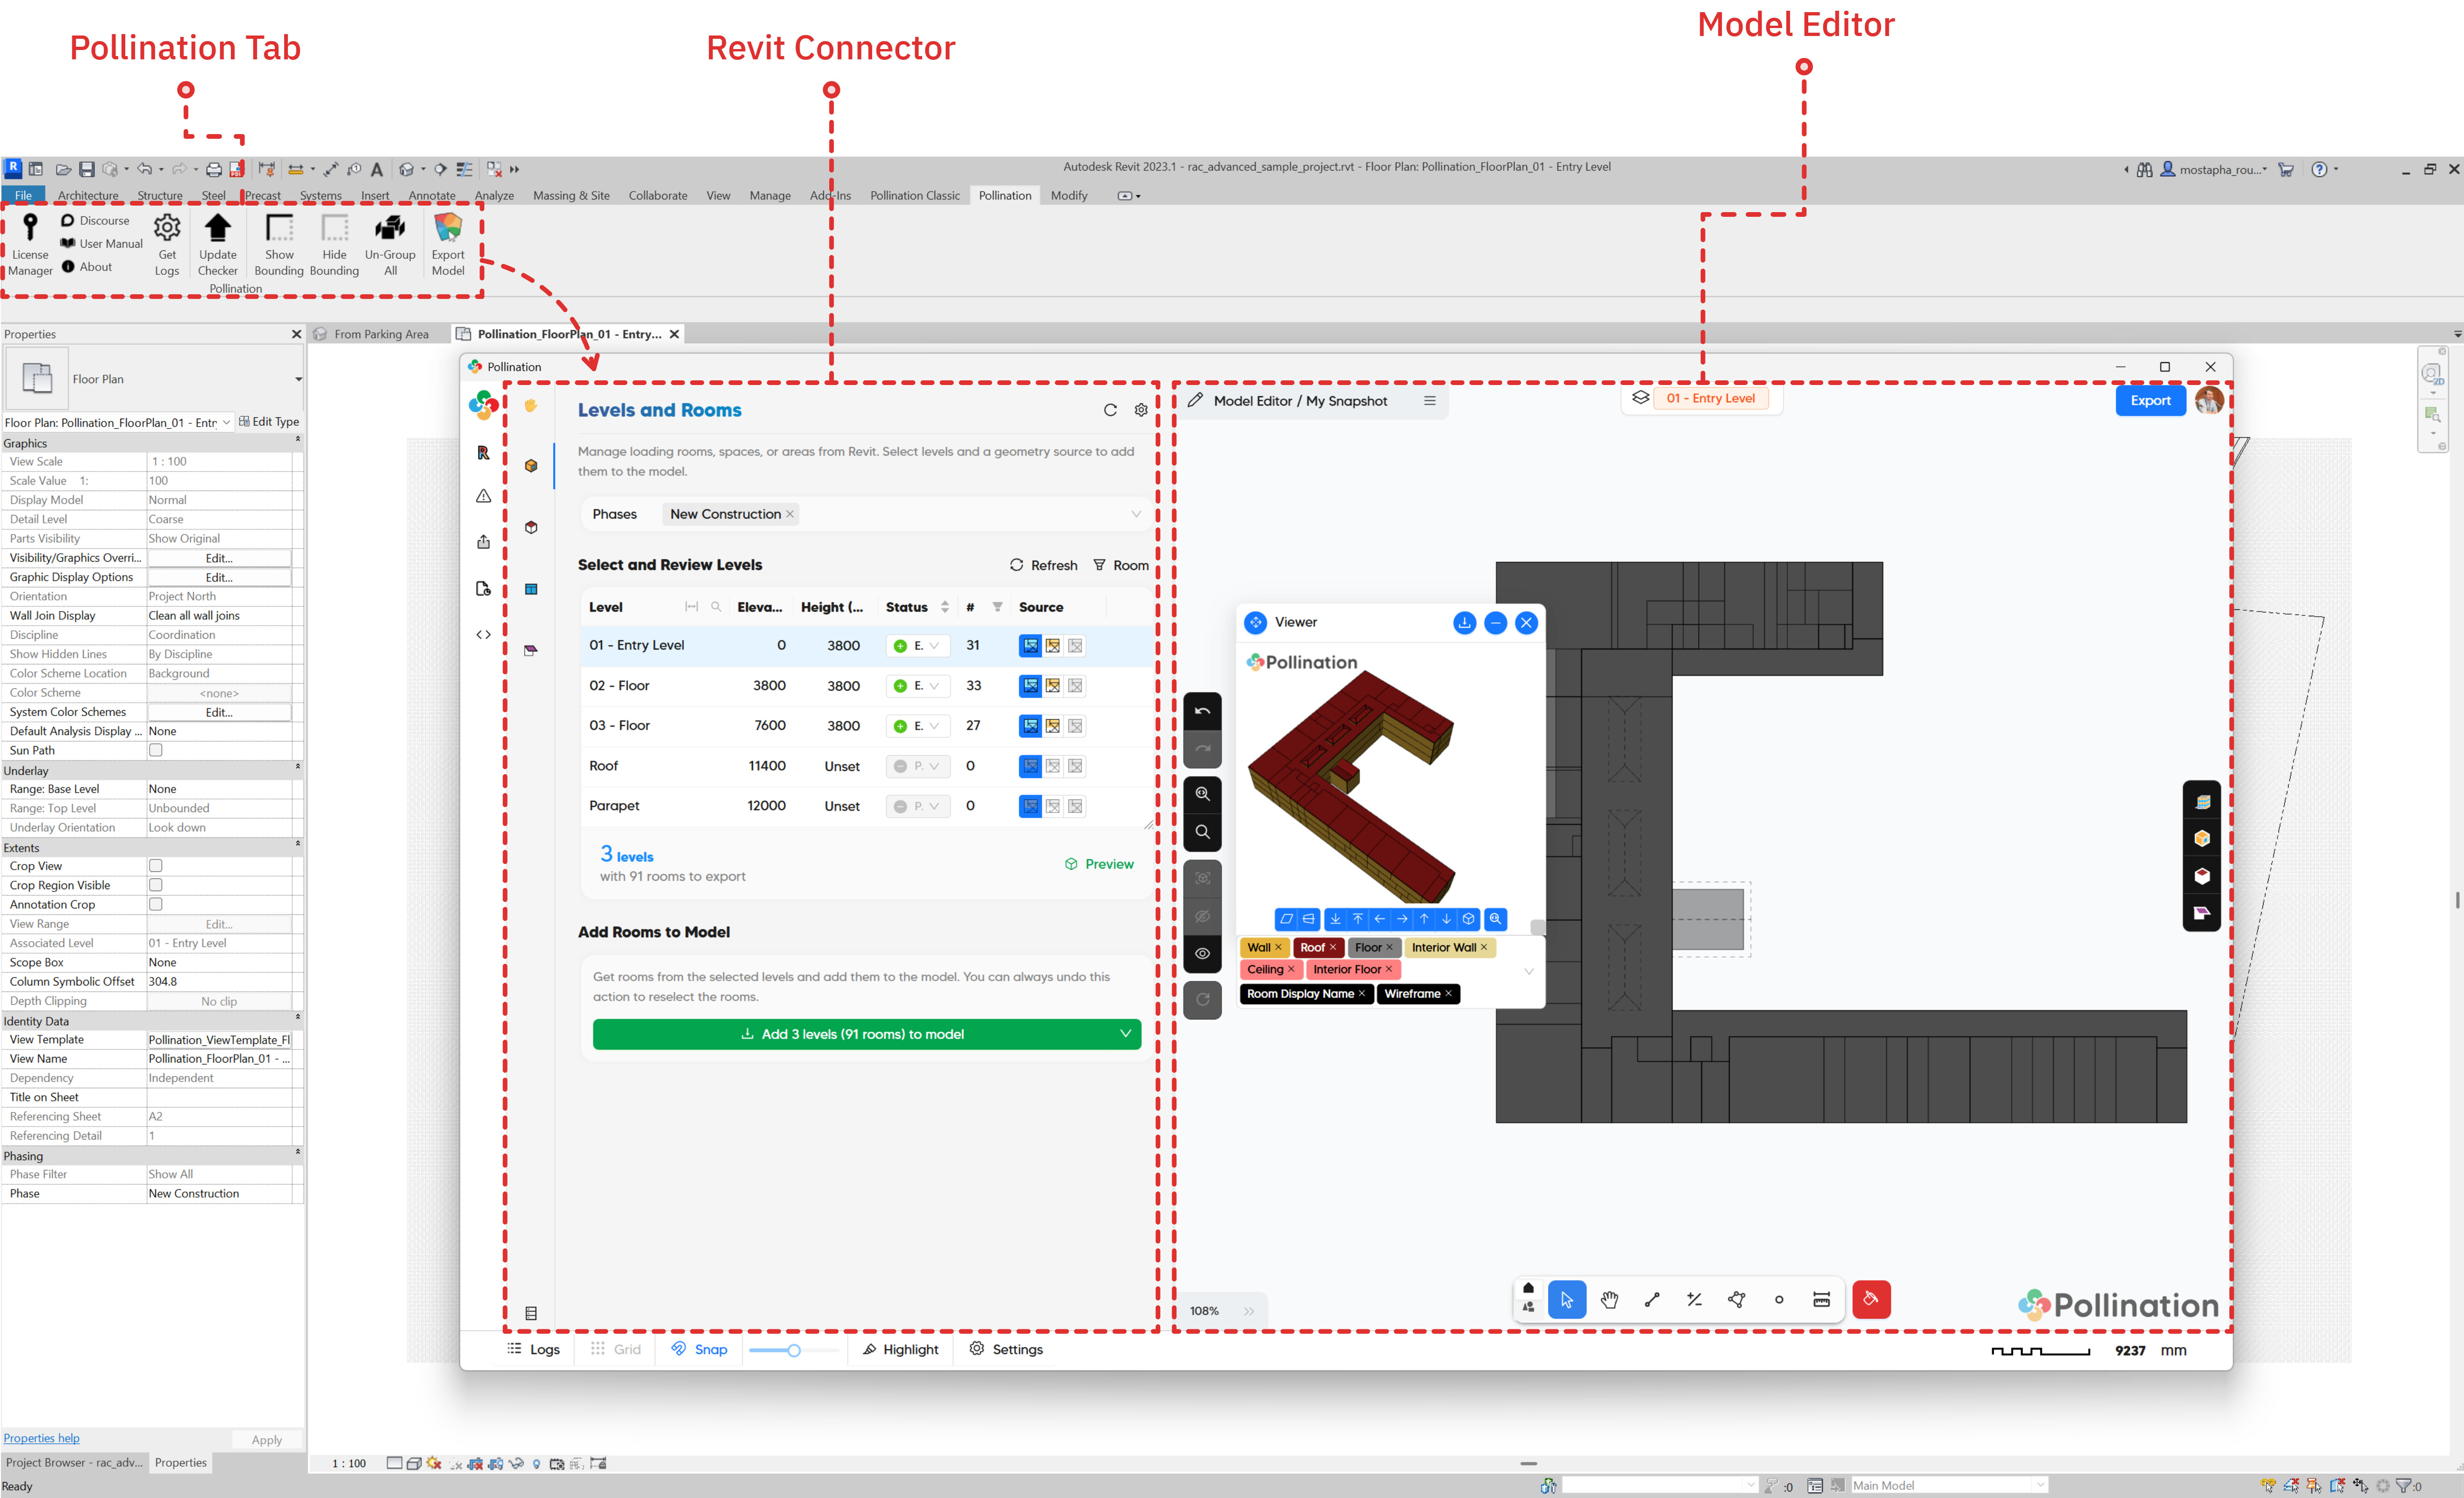
This is where the real ‘Pollination magic’ happens. You can send your model from Revit to the Editor in just a few clicks and start the cleanup process immediately. It’s the best of both worlds: you stay within the Revit environment where you can access the original model data, but you gain a powerful, specialized workspace to get models simulation-ready faster than ever.
This means if you need to sync those rooms back to a new Revit geometry it’s now just one click away. We’ve also added more flexibility with your data. You can now automatically set room names and zones based on any existing parameters inside Revit.
(And yes, if you can help us with some clarifications, you’ll be able to set those parameters back in Revit very soon. Check out The Road to “Re-Pollinate” below for more on that!)
Four Major Level-Ups
While there are dozens of upgrades you’ll see in our upcoming tutorials, like faster routines and better meshing control, four specific changes fundamentally shift how you’ll work.
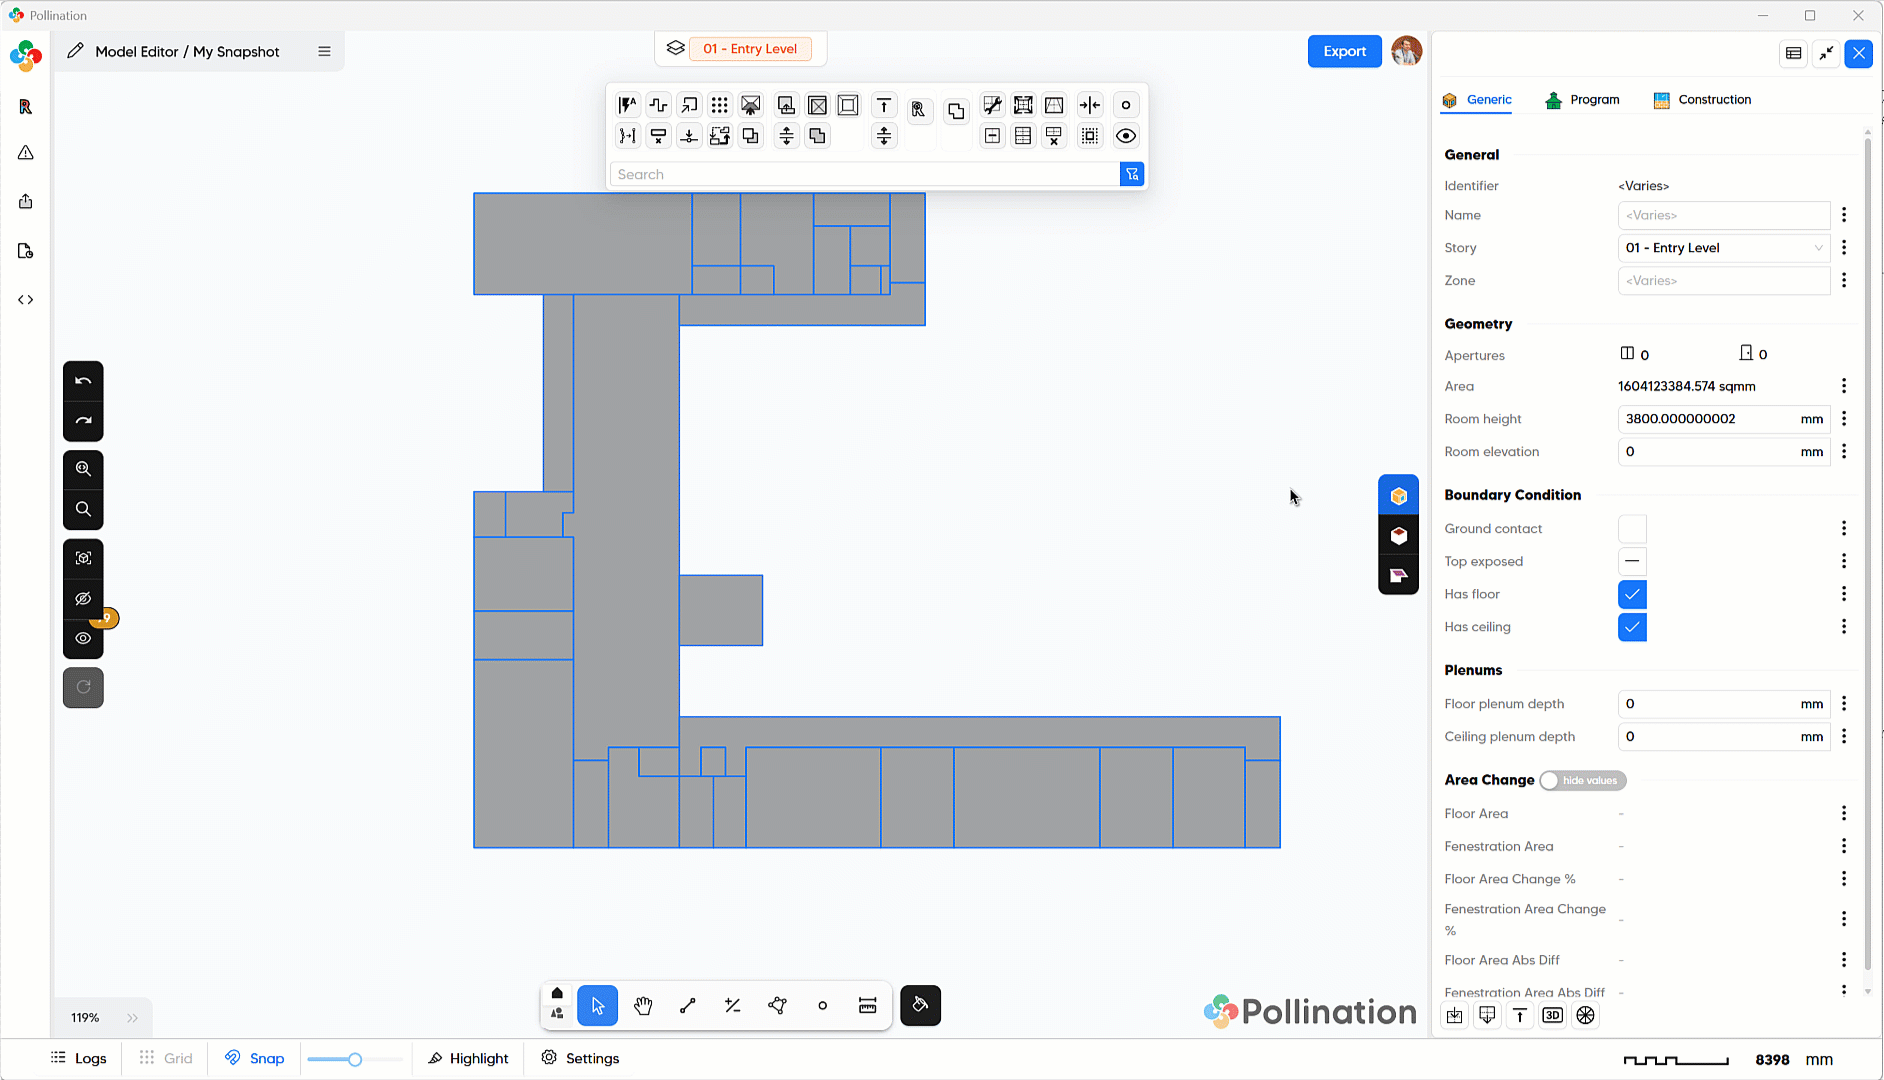
1. The Layered Workflow (Building with Logic)
We’ve broken down the model-building process into logical layers. It’s essentially an automated version of how you’d build a model manually: start with rooms, clean them up, add roofs, clean those up, then doors and windows, and finally shades.

This is the backbone of our forgiving workflow. If you realize you missed a door family after exporting, you don’t have to start from scratch. Just add the family and load it in. In the “Classic” version, that meant a full re-export. Now, it’s just a quick update. Plus, because it’s layered, you can edit room edges without worrying about what happens to the windows or roofs.
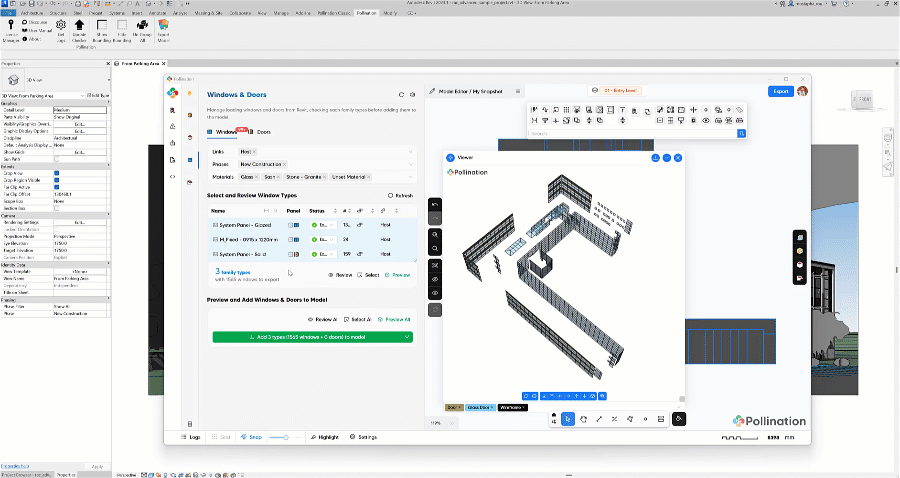
2. Visual Selection (No More Endless Tables)
One of the biggest pain points in the Classic plugin was selecting windows and doors from a massive table. It was daunting for large projects.
While tables are still an option, you can now use Revit Views for selection. Pollination creates the view for you automatically; you just hide what you don’t want and update your selection based on what’s visible. Done and done.
To everyone who asked for a better way to deselect interior windows: this one is for you.
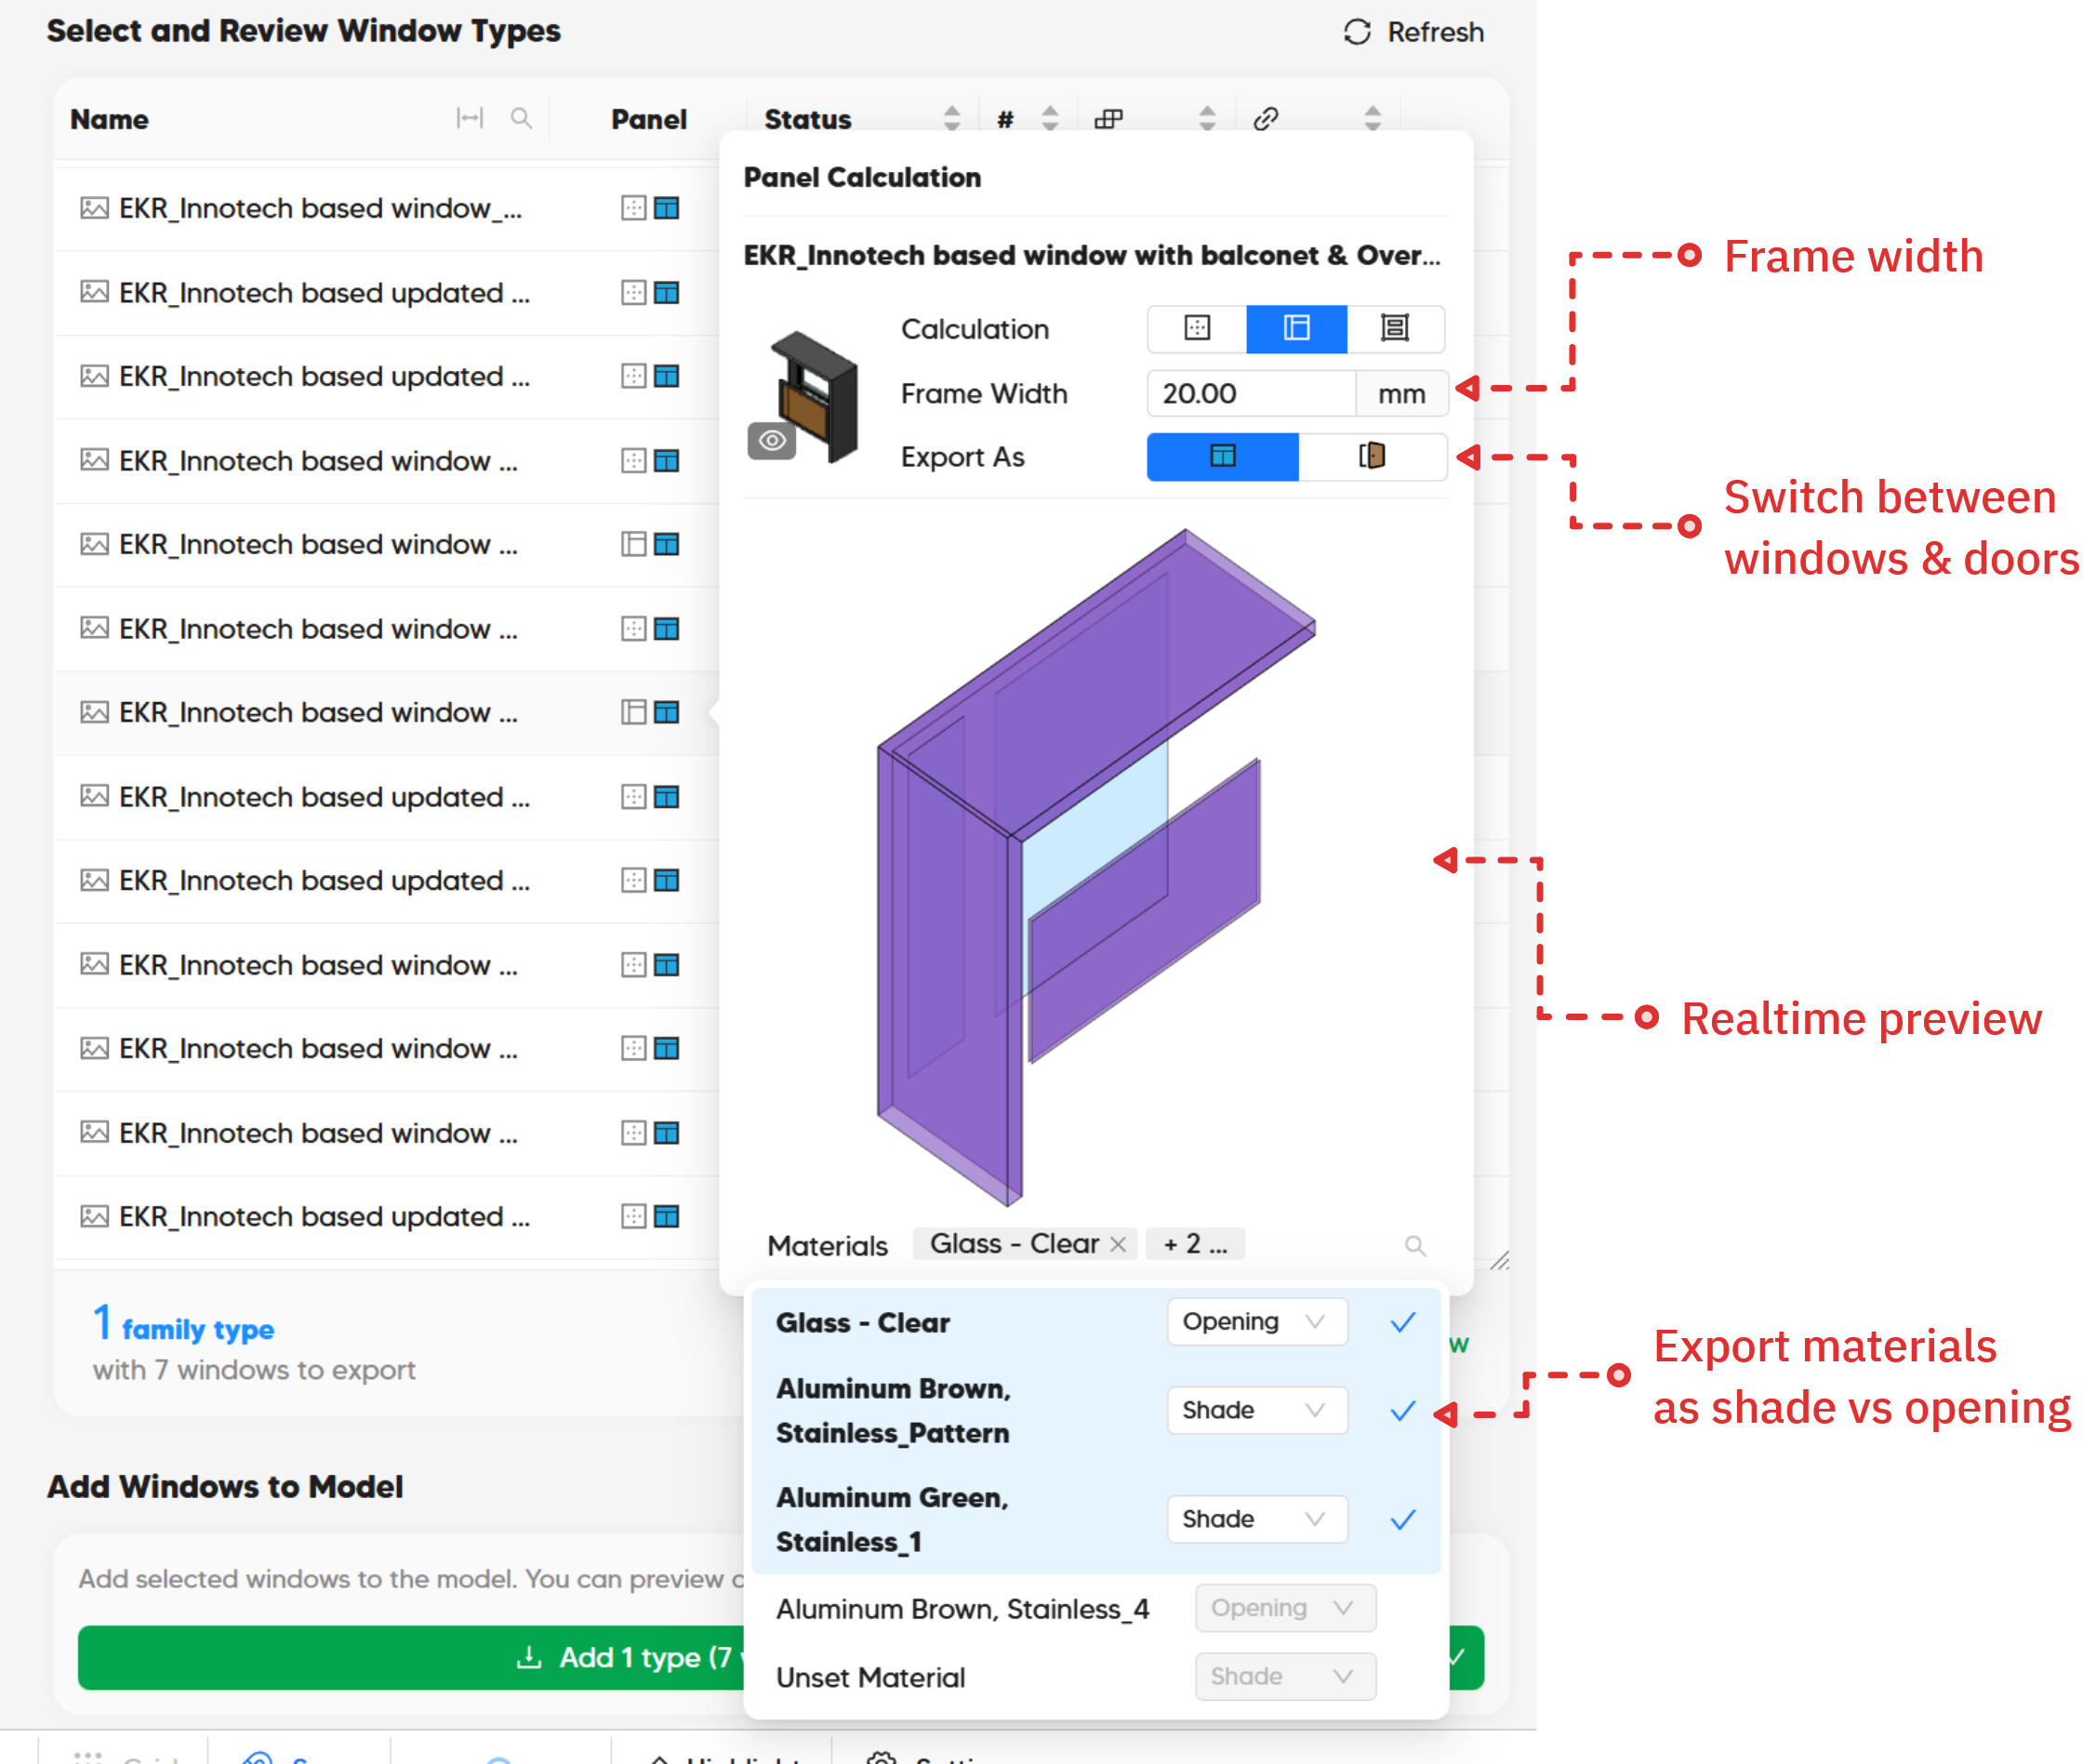
3. High-Fidelity Windows Exports
Window geometry has also been one of the biggest hurdles in a clean export. Different software have different requirements about including the windows frame. In addition, in Revit curtain walls, the frame is part of the curtain wall and not the panel. Finally, some window families include shading elements. We’ve listened to your feedback, particularly from our IESVE users, and built in native support for the most requested features:
- Frame Width: You can now include precise frame thickness for each window family in your exports, ensuring meeting the requirements of certain compliance modeling.
- Spandrel Mapping: You can now model spandrel panels as doors with a single click.
- Integrated Shading: If your shades are modeled within the window family, you can assign them to export as shades using the materials filter.
These changes will minimize the time for fixing windows outside Pollination.
4. Ending the “Blind” Cleanup with DXF Backgrounds
Last but not least, you can now load DXF backgrounds into the Model Editor with a single click.
I read hundreds of comments on Discourse and via email every week, and some really stick with me like this one from Maddie (@maddiegardner): “[…] I’m dying to be able to load 2D floorplan (DXFs/DWGs) in Model Editor. Without this, I feel like im reviewing my pomfs blind.”
I should also give credit to Max (@maxhanning) from the IES team that brought this up several times as a user feature request. With DXF support, that “blind” feeling is officially a thing of the past. You now have a clear visual guide to help you make cleanup decisions faster.
The Road to the “Simple Re-Pollinate” Future
Now that the geometry translation is mostly addressed, we’ve started looking into the next big hurdle: data automation. We’ve started mapping Revit Space types directly into Pollination program types, a feature many of you have been asking for.
This is the key to the “Simple Re-Pollinate” future. The goal is to automate program type assignments so that architectural updates become a non-event. As Josiah (@josiahfce) put it: “It would make any architectural update a simple ‘re-pollinate’ from the new Revit model, since all the parameters are already stored.”
We already support program type exports for EnergyPlus, OpenStudio, and eQuest. We’re currently polishing a new gbXML + CSV workflow for TRACE700, and once that’s live, we’ll be looking toward IESVE, DesignBuilder, and IDA ICE but not necessarily in that order.
Closing the Loop: Adding Simulation Results in Revit
Our best guess for the next natural step, based on many conversations with you, is to simplify the process of bringing simulation results back into Revit.
Heating and cooling loads and airflows are the obvious starting points, but we’re curious: What else do you need to see back in Revit, and why?
Are you looking for these values primarily for documentation, or are there specific post-processing workflows they need to feed into? We’re in “learning mode” on this one, so please let us know what you’d like to see and, more importantly, why. Your feedback here will directly shape what we build next.
See it in Action & Get Started
Enough talking! This recording walks you through the entire process. We took a Revit model and got it simulation-ready, including the ‘real-world’ details like adjusting frame thicknesses and modeling spandrels as doors, in less than 40 minutes. Not too bad if you ask me!

We’ve also started refreshing our documentation. If you’re looking for a deep dive, check out our new hands-on tutorials for a detailed walkthrough of these features.
A Note on the “Classic” Plugin
If you’re already a Pollination user, you’ll find the mechanics of the new version familiar, just a lot more refined. We’ve shared this build with several power users, and the feedback has been overwhelmingly positive.
We know that when you’re in the middle of a deadline, you need a safety net. To ensure a smooth transition, we will be shipping Pollination Classic alongside the new version for the next few releases. You’ll find your familiar tools under the “Pollination Classic” tab, while the new experience lives under the “Pollination” tab.

Unless we hear otherwise from the community, we plan to eventually phase out the Classic version in a few months to focus all our energy on this new architecture.
We’re all ears
Now that the release is finally out, the next phase of the process starts with you. Download the new version, put it through its paces, and please share your thoughts on Discourse or via email. As always, we are looking forward to hearing from you. We’re excited to see the joy this brings to you, and while I know ‘joy’, ‘Revit’, and ‘energy simulation’ are rarely used together, I hope we’ve earned the exception there, too. Thank you!
Finally, If you’re attending SimBuild, we’re teaching two workshops on May 19, 2026. This is the perfect opportunity to get hands-on experience with the new plugin and see these workflows in action. You can find more information and register here: SimBuild | IBPSA USA SimBuild
Mostapha on behalf of the ![]() team
team
P.S. Help us break the ‘Sample Model’ curse
I know there’s a bit of irony in me saying we build for ‘real-world projects’ while still using the standard Revit sample model for the demos! As many of you know, every real world project that we get comes with a confidentiality tag.
If you have a non-confidential, real-world project that has given your simulation workflow a hard time, we would love to use it as our demo project! Help us break the “sample model” curse. Thank you!