Hi everyone, i have used this a bit and i think i noticed something. When we have 2 adjacent blocks and want to isolate only one block it did not get the wall-wall or roof-roof lines to the adjacent block even with including co_planar.
Hi @aishanuraaa, thank you for reporting this. Can you share a small model or a screenshot with us so we can recreate this issue?
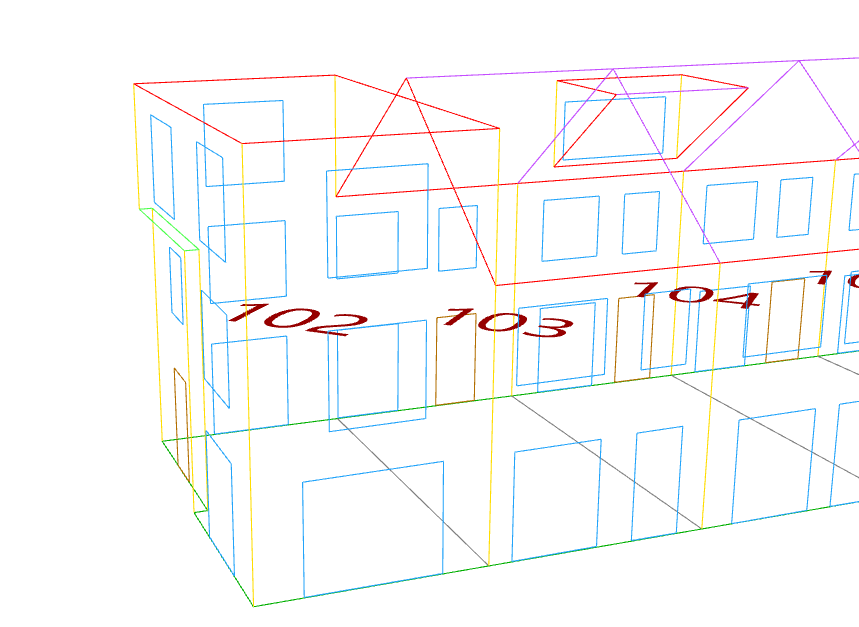
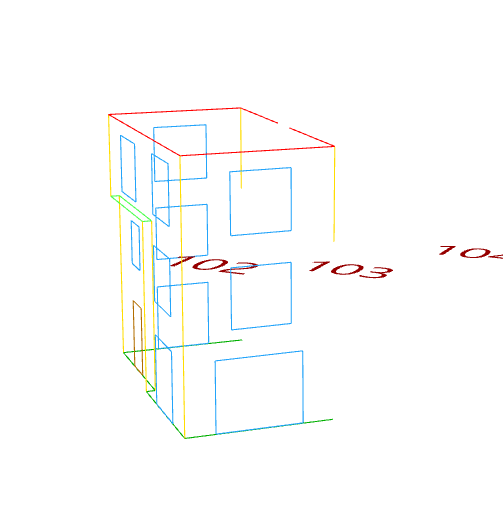
Thank you, @aishanuraaa! Can you also upload the sample file that you used to make our life easier. 
I think this is the expected behavior. Without the adjacent room, we cannot identify what type of thermal bridge it is. You can always reset the adjacencies by using the “Merge Coplanar Faces” command and then you’ll see the line show up as a thermal bridge with an exterior boundary condition. But we don’t know that the room is adjacent to another one when that adjacent room is not passed to the thermal bridge report routine.
What you are asking for here where you still calculate all thermal bridges across the whole model and then filter the result by a selection of rooms requires a different backend architecture.
With the help of @antonellodinunzio , I think we can find a way to do this type of filtering based on the selection.
I still think sharing a sample file will be very helpful. Are you using the Model Editor to generate the graphics or using Grasshopper? Can you please share more context in addition to the screenshots?
Hi, sorry for the delay. Here is the GH file.
preview_envelope_edges2 - vector.gh (272.9 KB)
Thanks, @aishanuraaa .
I did not realize you were working in Grasshopper. Getting what you want in Grasshopper is far easier than changing things in the Model Editor. I can just tweak your Grasshopper script to do what I recommended above:
However, to do this, I need to have your full original model internalized in the Grasshopper file. I only have a part of it here:
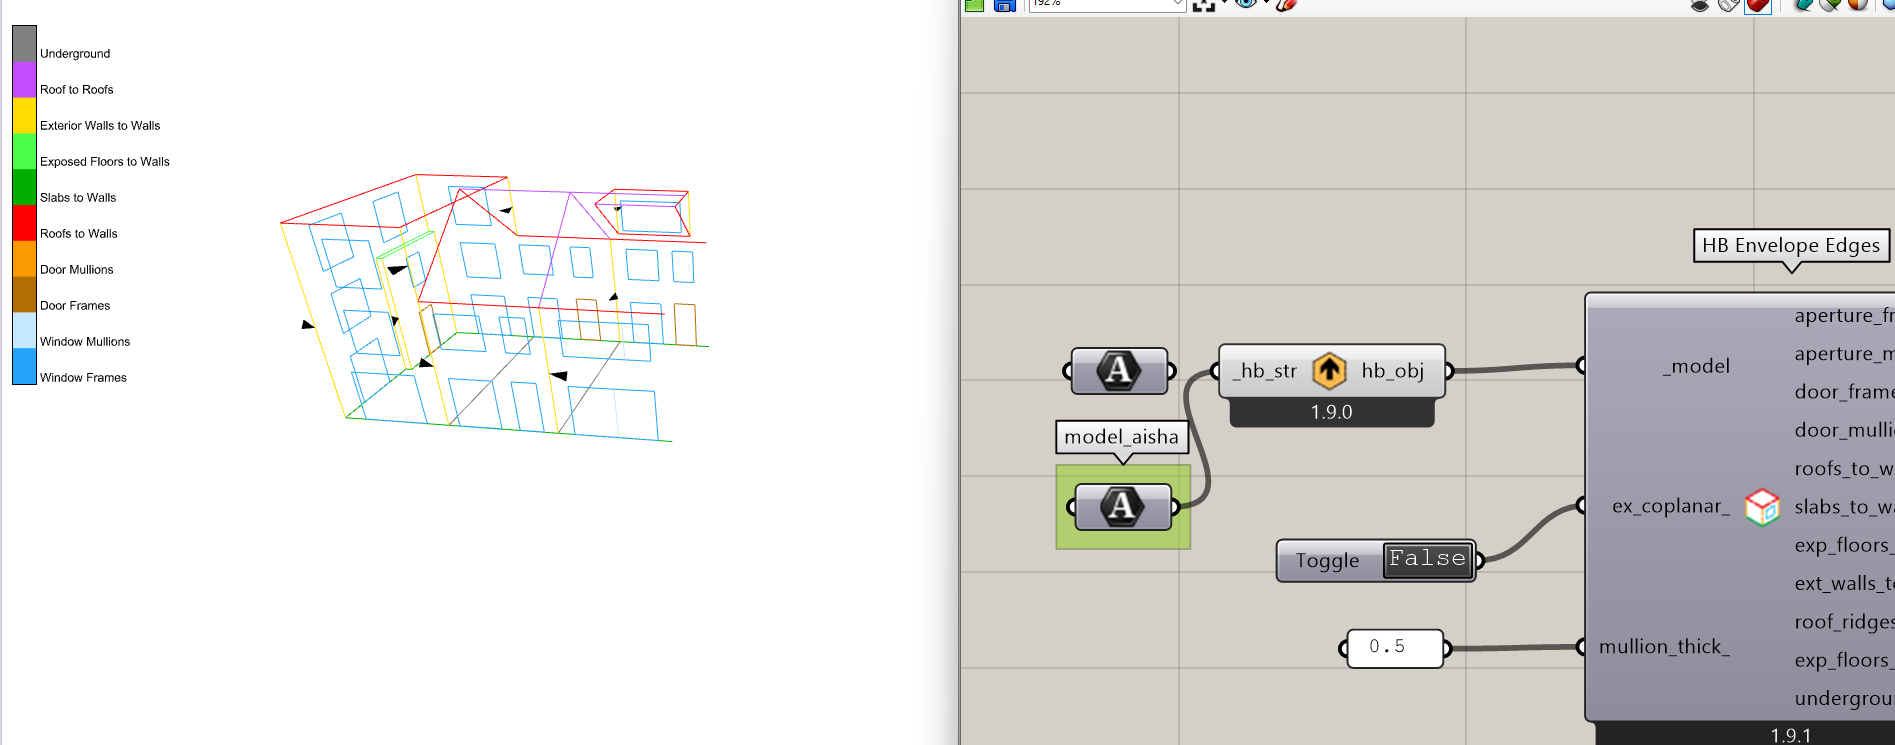
If you can get me your full model, I can give you a script that does what you want.
Chris, I think that is the full model. Could you work with that or do you mean other kind of internalised model like the brep?
I also noticed other things, the lowest window frame overlaped with the floor. Is the expected outcome to keep both or the green lines should be cut by the window frame like the picture below? If it is possible, I would expect that the green line and blue line not overlapped.
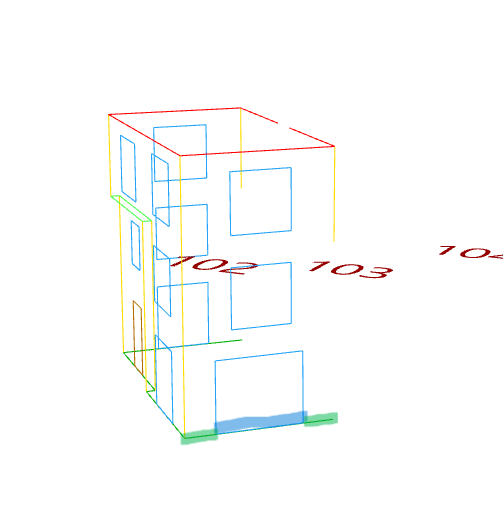
Thanks, @aishanuraaa,
I had assumed that there is more to the model because there is this Surface boundary condition at the end, which I presumed connected to another part of the model:
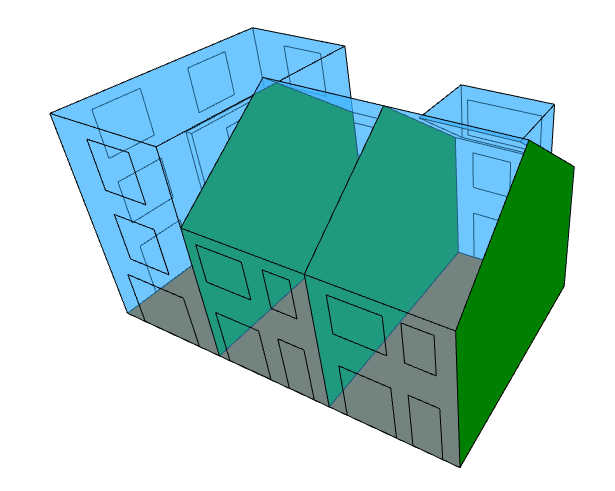
But, if that is actually supposed to be an adiabatic boundary condition at the end, I can just patch the missing adjacency.
The more I looked at this and the other topic you posted, I think you just want to do your own custom post-processing within a GHPython component. You can see in the Grasshopper component source code that all of the edges are associated within individual room faces here in the function that classifies the edges of each room:
So you can just pull off the orientation of the thermal bridges by analyzing those Honeybee Faces and those Faces are also what tell you the room associated with each edge.
When I get the chance, I’ll put together a custom GHPython component that should give you everything you need to do your custom analyses. I am thinking it just gives you each thermal bridge edge and that Honeybee Faces associated with it so you can you your own custom analysis of these faces to evaluate what type of thermal bridge it is and what orientation it is facing. I’ll include a room_filter_ option so that you can get the result filtered by a subset of rooms in the full model.
Yes, in my experience, the way you account for thermal bridges of fenestration is very different than the way you account for things like a wall-to-slab-floor connection. So you would typically want the fenestration thermal bridge accounted for separately so that you can consider it’s impact on things like edge-of-glass U-value. And you would want the floor-to-ground connection separate to account for things like how the floor insulation wraps around the footing or whatever foundation element is holding up the exterior wall.
If you’re using some other thermal bridge method that is different from the ones I am used to, please describe it clearly and I’ll think of the best way to support it with the current core libraries and Grasshopper components. In other words, do you just want the fenestration thermal bridge discounted in this case? Or should the fenestration thermal bridge be overriding and splitting the ground slab thermal bridge.
Hi @aishanuraaa ,
You can find a script below that uses a couple of custom GHPython components with a few lines of code in them that leverage the honeybee Python SDK. These custom components use a some new methods that I just recently added to the Python SDK so that you don’t need to have as much code inside the components themsleves. So you will need to run the LB Versioner component and restart Rhino to get the latest Python libraries in order to use the following Grasshopper script:
preview_envelope_edges2 - vector.gh (284.2 KB)
After this, these new components and .gh file should allow you to do all of the customized analyses that you are hoping to perform on the different room edges by giving you access to the room face objects that adjoin each edge.
Here is what the full script looks like:
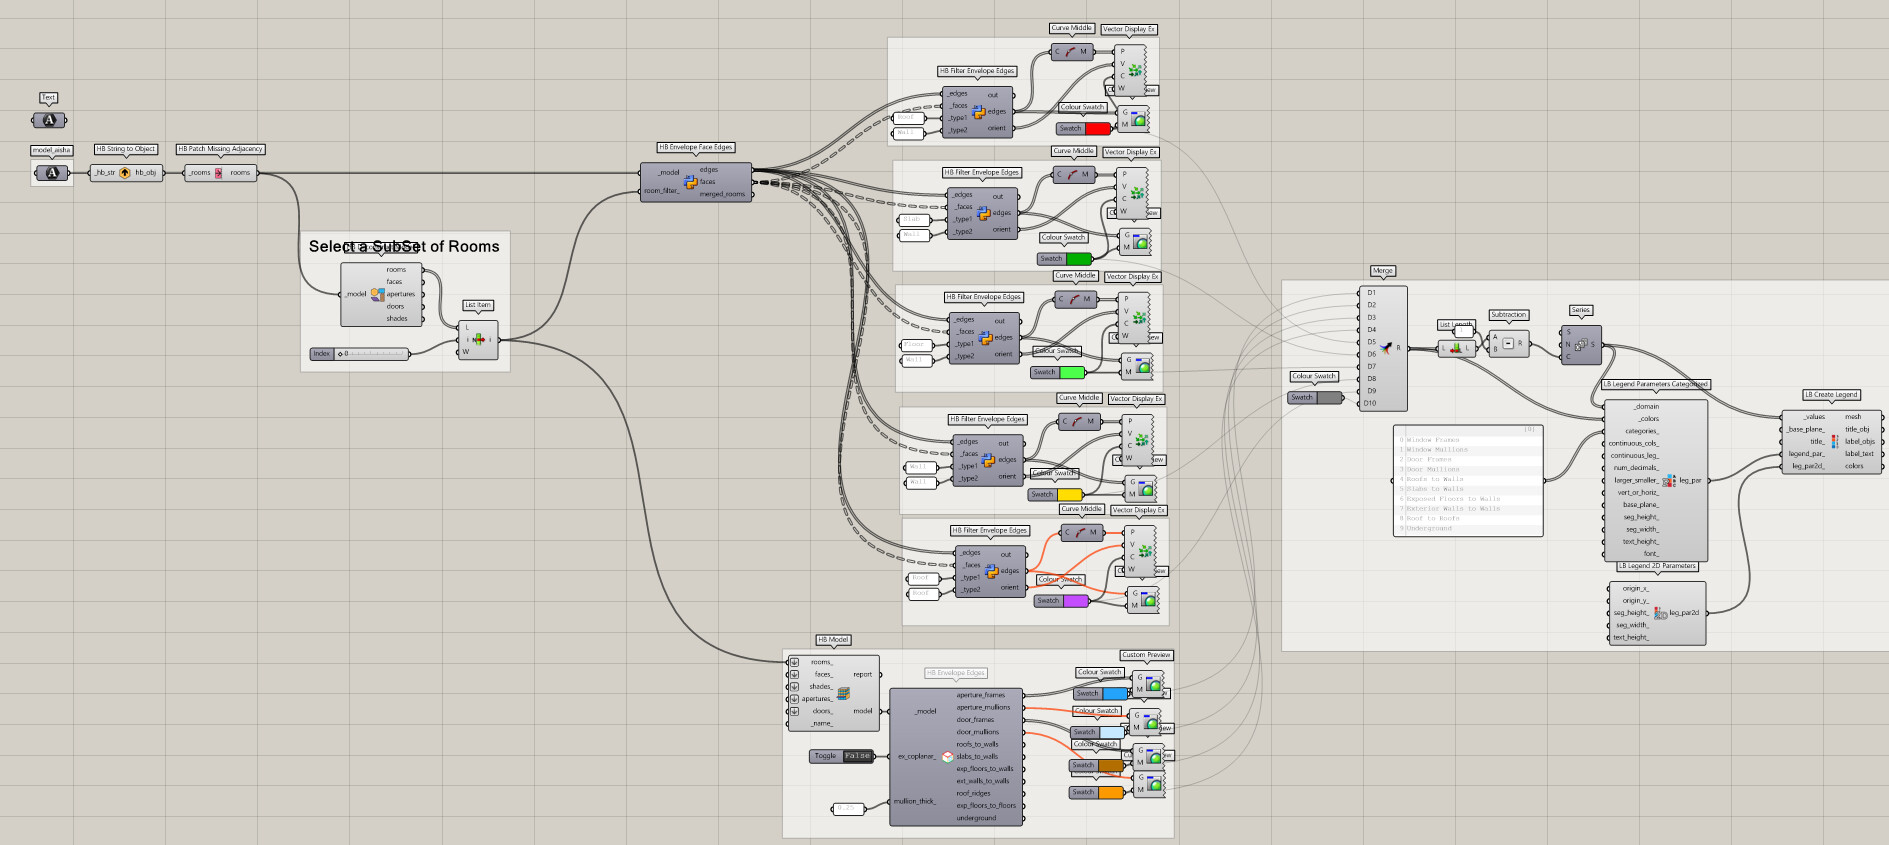
You can see that it’s broken down into two parts. The first does the whole calculation of envelope edges (including an option to filter the output by rooms) and it returns each envelop edge along with the Honeybee Face objects that adjoin it.
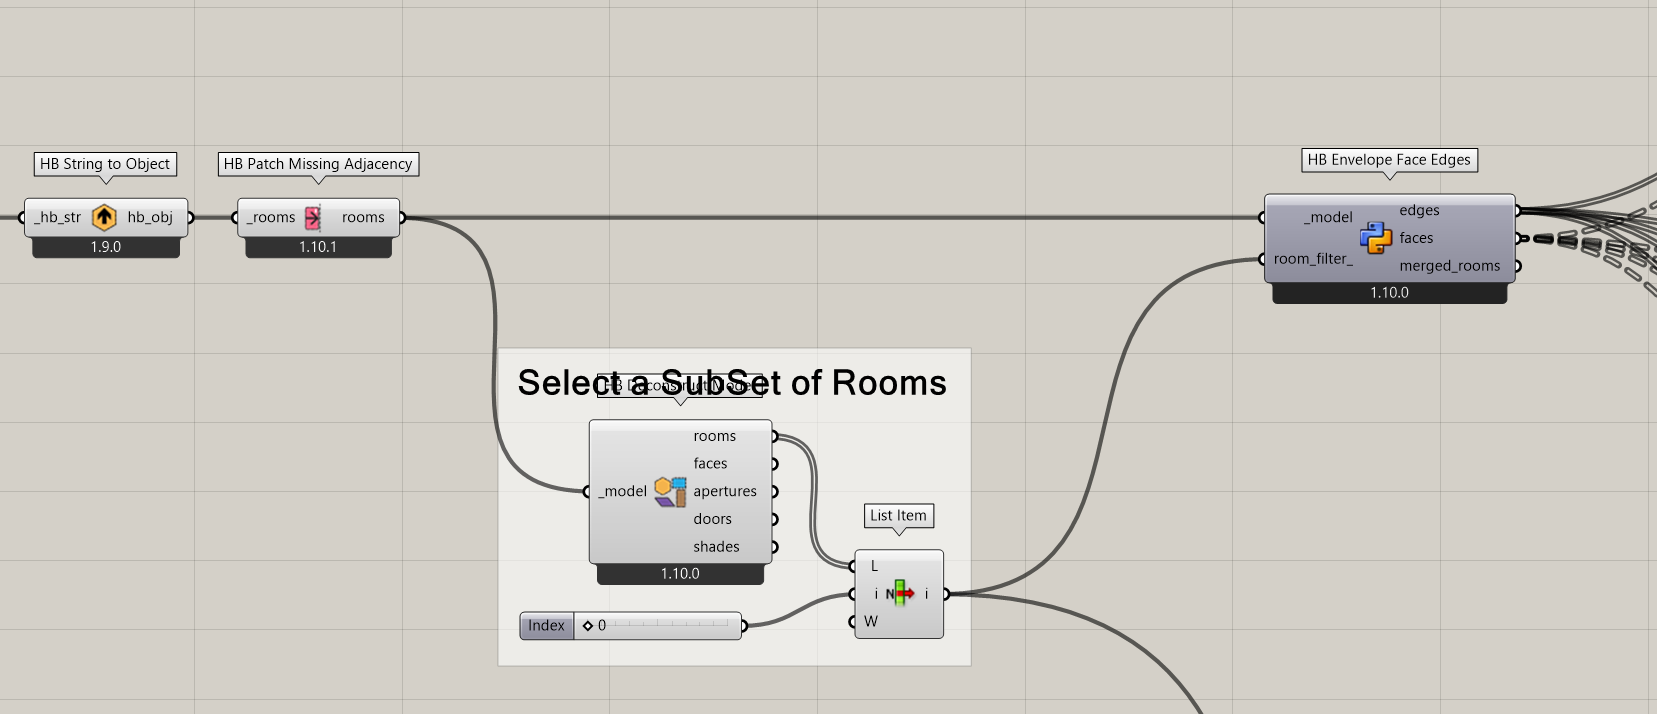
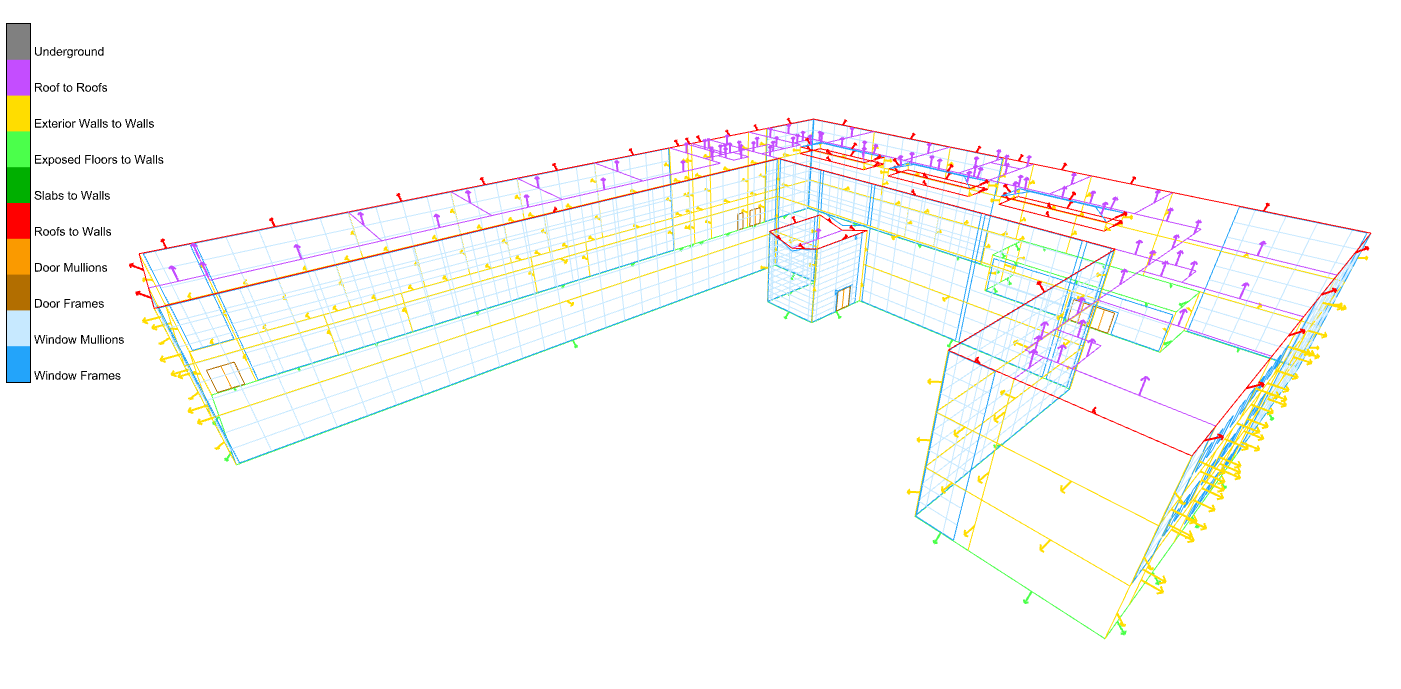
The second part uses the edges coordinated with faces to filter the edges by the type of edge (eg. Roof-to-Wall). It also gives you the orientation of each edge as dictated by the adjoining faces addressing your request here.
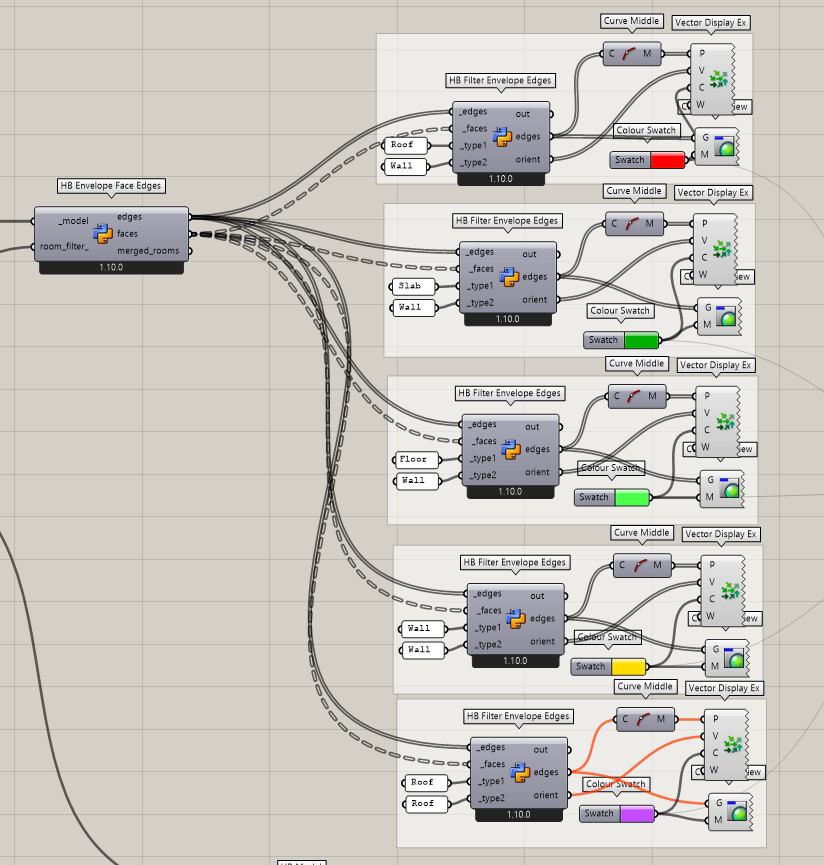
This allows you to get the individual room edges for a subset of the model along with the direction that each edge faces:
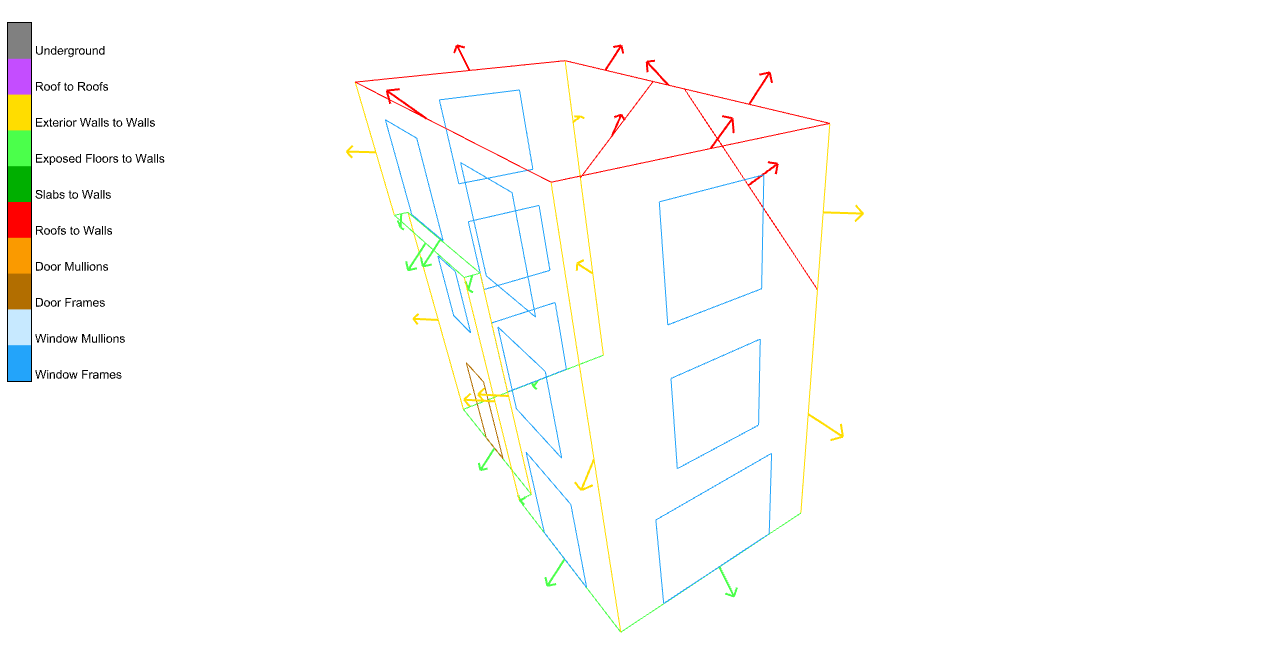
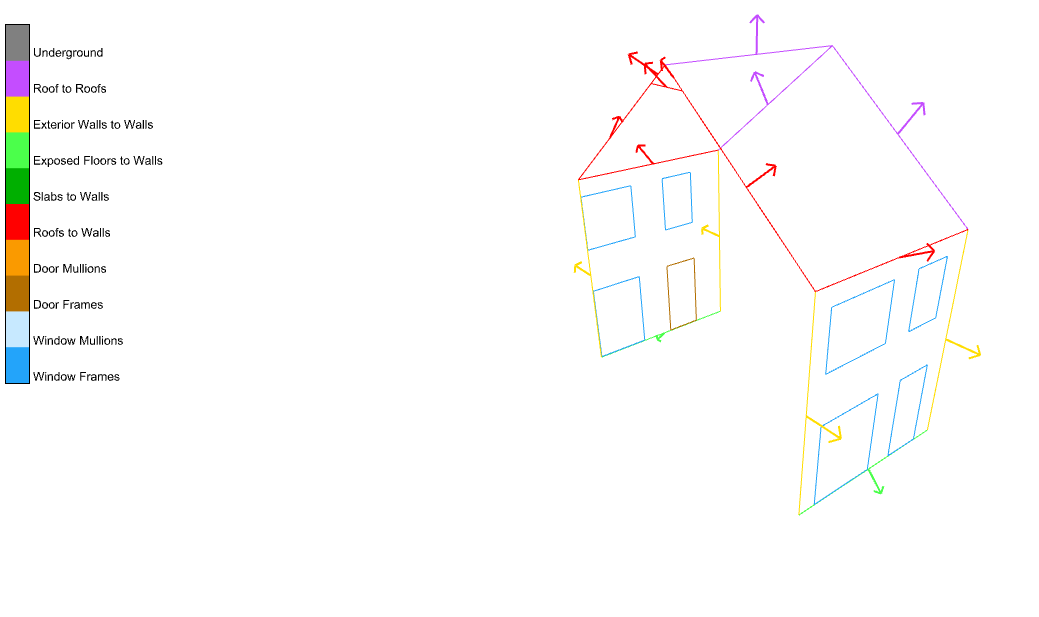
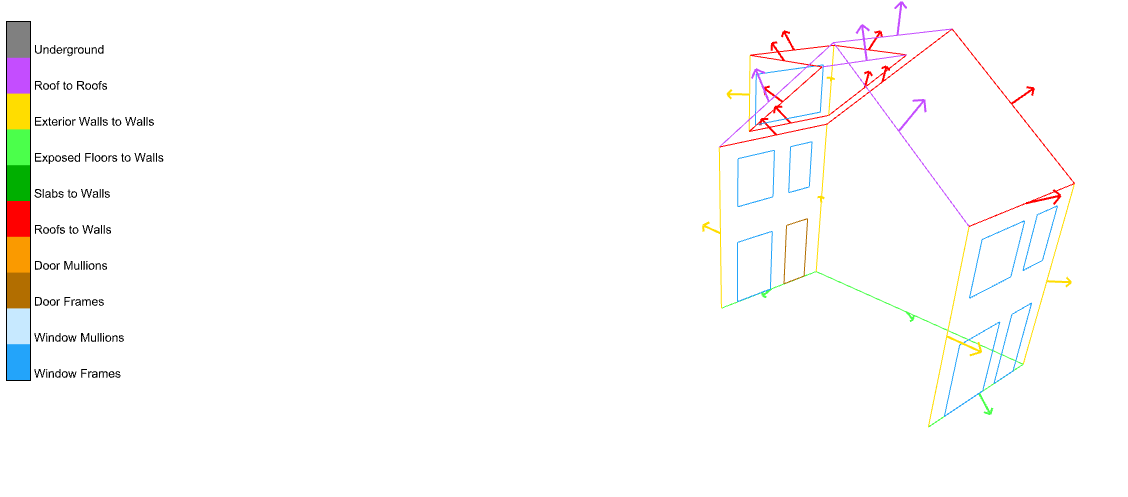
… Or you can get the orientations of edges for the whole model by disconnecting the room_filter_:
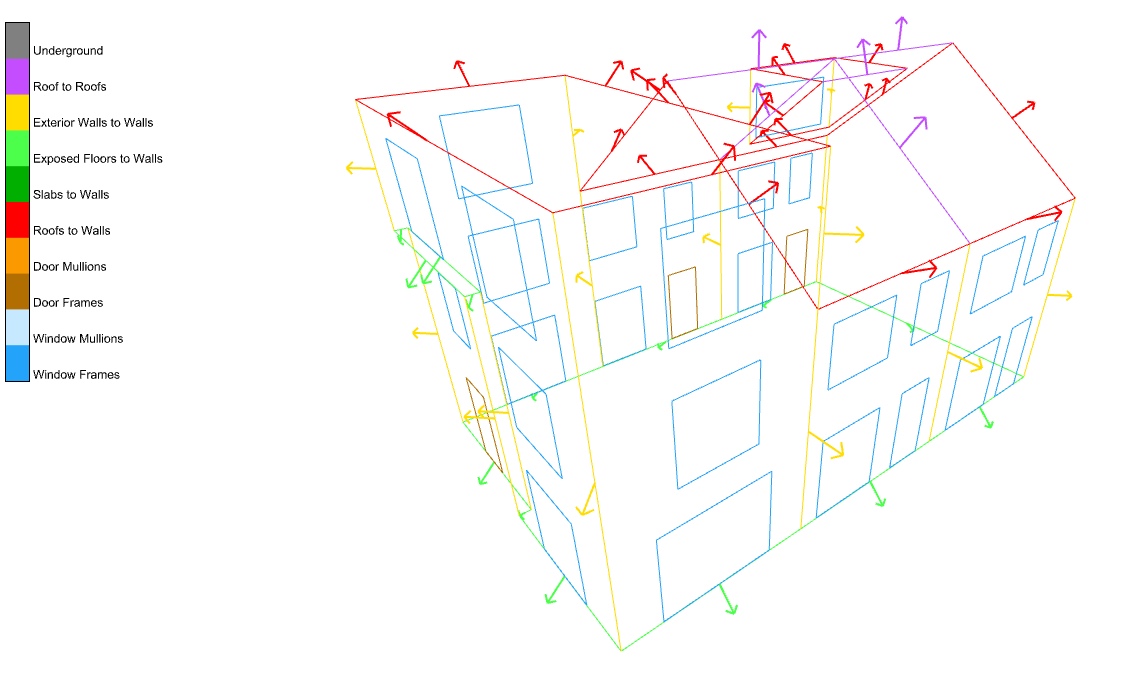
Since the script pretty clearly works to filter the edges by rooms, I am going to unassing myself from this issue but just let me know if you have any questions about it, @aishanuraaa, and I’m happy to reassign myself and answer.
And, if you have future types of custom analyses that you want to perform on the envelope edges, I would recommend opening topics on the Ladybug Tools forum instead of here on the Pollination forum.
Once you cross into the real of making custom Grasshopper components with the Ladybug Tools SDK, you are more in the realm of Ladybug Tools rather than Pollination.
Chris, this is really great thank you! I have tried your steps, updating and restart rhino but I got this error message.
Downloading “lbt-grasshopper” github repository to: C:\Users\APRI\ladybug_tools\temp
Installing Ladybug Tools core Python libraries.
Installing “lbt-dragonfly==0.13.207” version via pip
Package “lbt-dragonfly” may not have been updated correctly
or its usage in the plugin may have changed. See pip stderr below:
b" WARNING: The scripts f2py.exe and numpy-config.exe are installed in ‘C:\Users\APRI\ladybug_tools\python\Scripts’ which is not on PATH.\r\n Consider adding this directory to PATH or, if you prefer to suppress this warning, use --no-warn-script-location.\r\nERROR: Could not install packages due to an OSError: [WinError 5] Toegang geweigerd: ‘C:\\Users\\APRI\\ladybug_tools\\python\\Lib\\site-packages\\~=mpy.libs\\libopenblas64__v0.3.23-293-gc2f4bdbb-gcc_10_3_0-2bde3a66a51006b2b53eb373ff767a3f.dll’\r\nConsider using the--useroption or check the permissions.\r\n\r\n\r\n[notice] A new release of pip available: 22.3.1 → 26.2.1\r\n[notice] To update, run: C:\Users\APRI\ladybug_tools\python\python.exe -m pip install --upgrade pip\r\n"
Installing “fairyfly-therm==0.10.18” version via pip
Fairyfly successfully installed!Installing Ladybug Tools Recipes.
Installing “lbt-recipes==0.28.9” version via pip
Ladybug Tools Recipes successfully installed!Installing ladybug-rhino Python library.
Installing “ladybug-rhino==1.45.0” version via pip
Ladybug-rhino Python library successfully installed!Installing Ladybug Tools Grasshopper components.
Installing “lbt-grasshopper==1.10.52” version via pip
Ladybug Tools Grasshopper components successfully installed!.gha files already exist in your Components folder and cannot be deleted while Grasshopper is open.
These .gha files rarely change and so it is not critical that they be updated. However, if you want to be sure that you have the latest version installed, then close Grasshopper, delete the ladybug_grasshopper_dotnet folder at
C:\Users\APRI\AppData\Roaming\Grasshopper\Libraries\ladybug_grasshopper_dotnet
and rerun this versioner component to get the new .gha files.Installing Ladybug Tools Measures version 0.3.3.
Downloading “lbt-measures” github repository to: C:\Users\APRI\ladybug_tools\resources\measures
Copying “lbt_measures” source code to C:\Users\APRI\ladybug_tools\resources\measuresInstalling Honeybee energy standards.
Installing “honeybee-energy-standards==2.3.4” version via pip
Honeybee energy standards successfully installed!Change to Version 1.10.52 Successful!
RESTART RHINO to load the new components + library.
The “LB Sync Grasshopper File” component can be used
to sync Grasshopper definitions with your new installation.Runtime error (ValueErrorException): Downloading “lbt-grasshopper” github repository to: C:\Users\APRI\ladybug_tools\temp
Installing Ladybug Tools core Python libraries.
Installing “lbt-dragonfly==0.13.207” version via pip
Package “lbt-dragonfly” may not have been updated correctly
or its usage in the plugin may have changed. See pip stderr below:
b" WARNING: The scripts f2py.exe and numpy-config.exe are installed in ‘C:\Users\APRI\ladybug_tools\python\Scripts’ which is not on PATH.\r\n Consider adding this directory to PATH or, if you prefer to suppress this warning, use --no-warn-script-location.\r\nERROR: Could not install packages due to an OSError: [WinError 5] Toegang geweigerd: ‘C:\\Users\\APRI\\ladybug_tools\\python\\Lib\\site-packages\\~=mpy.libs\\libopenblas64__v0.3.23-293-gc2f4bdbb-gcc_10_3_0-2bde3a66a51006b2b53eb373ff767a3f.dll’\r\nConsider using the--useroption or check the permissions.\r\n\r\n\r\n[notice] A new release of pip available: 22.3.1 → 26.2.1\r\n[notice] To update, run: C:\Users\APRI\ladybug_tools\python\python.exe -m pip install --upgrade pip\r\n"
Installing “fairyfly-therm==0.10.18” version via pip
Fairyfly successfully installed!Installing Ladybug Tools Recipes.
Installing “lbt-recipes==0.28.9” version via pip
Ladybug Tools Recipes successfully installed!Installing ladybug-rhino Python library.
Installing “ladybug-rhino==1.45.0” version via pip
Ladybug-rhino Python library successfully installed!Installing Ladybug Tools Grasshopper components.
Installing “lbt-grasshopper==1.10.52” version via pip
Ladybug Tools Grasshopper components successfully installed!.gha files already exist in your Components folder and cannot be deleted while Grasshopper is open.
These .gha files rarely change and so it is not critical that they be updated. However, if you want to be sure that you have the latest version installed, then close Grasshopper, delete the ladybug_grasshopper_dotnet folder at
C:\Users\APRI\AppData\Roaming\Grasshopper\Libraries\ladybug_grasshopper_dotnet
and rerun this versioner component to get the new .gha files.Installing Ladybug Tools Measures version 0.3.3.
Downloading “lbt-measures” github repository to: C:\Users\APRI\ladybug_tools\resources\measures
Copying “lbt_measures” source code to C:\Users\APRI\ladybug_tools\resources\measuresInstalling Honeybee energy standards.
Installing “honeybee-energy-standards==2.3.4” version via pip
Honeybee energy standards successfully installed!Change to Version 1.10.52 Successful!
RESTART RHINO to load the new components + library.
The “LB Sync Grasshopper File” component can be used
to sync Grasshopper definitions with your new installation.Traceback:
line 88, in script
@chriswmackey this is the error message in the component
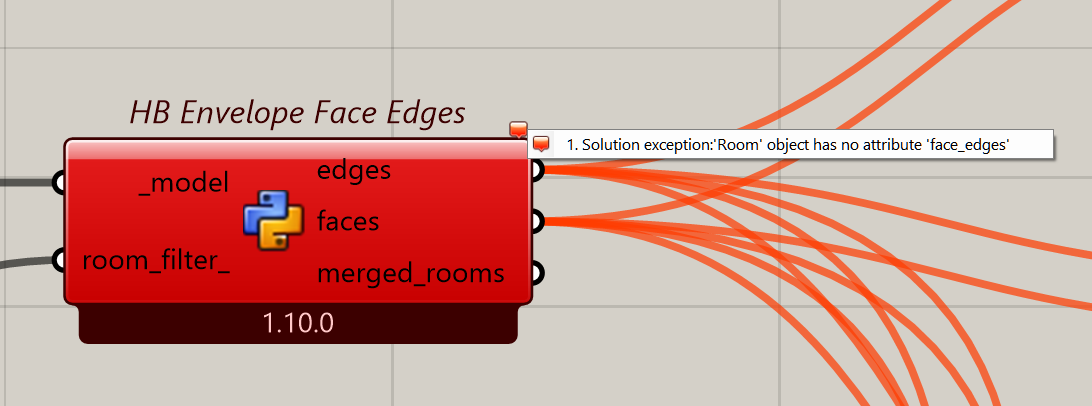
Hi @aishanuraaa ,
It looks like you encountered the same security issue that a lot of other people encountered with the LB Versioner over the last 3 days:
We pushed a fix to a new Pollination single-click installer yesterday, which is now available for download. If you can re-download the installer and run it, you should be able to run the sample .gh file that I posted here without issues.