Current TM59 Modelling Workflow using IES and Rhino
Sorry its taken me a while to get back to you on here but I have finally managed to find the time to explain how we are currently going about our TM59 modelling workflow using Rhino and Grasshopper for geometry preparation, IESVE for thermal simulation, and custom VE scripts for automation and post-processing.
1. Geometry Setup in Rhino
The process begins in Rhino, where all zones are modelled as closed polysurfaces.
We use an internal standard Rhino template file that contains a set of predefined layers corresponding to TM59 room types. Examples include:
TM59 - Double BedroomTM59 - Single BedroomTM59 - Living RoomTM59 - Corridor
Each room polysurface is placed onto the appropriate layer according to its TM59 room classification.
In addition to the layer assignment, every room is given a unique name using the Rhino Properties panel. A typical naming convention might look like:
10.01.05 Bedroom 110.01.05 Bedroom 210.01.05 Corridor 1
Once the rooms have been created and named, the window geometry is added to the façade surfaces, along with external shading elements where applicable.
At this stage, the Rhino model contains:
- All thermal zones
- Window openings
- Shading geometry
- Layer assignments representing TM59 room categories
This geometry is then passed to Grasshopper for further processing.
2. Room Code Assignment via Custom Grasshopper Python Component
Inside Grasshopper, the first step is to run a custom Python component that modifies the names of the Rhino room polysurfaces.
The script appends a room code suffix to each room name based on the layer the geometry belongs to.
Examples:
| Original Name | Modified Name |
|---|---|
| 10.01.05 Double Bedroom 1 | 10.01.05 Double Bedroom 1_DBL |
| 10.01.05 Single Bedroom 2 | 10.01.05 Single Bedroom 2_SGL |
| 10.01.05 Corridor 1 | 10.01.05 Corridor 1_COR |
These suffixes represent room classification codes, such as:
_DBL→ Double Bedroom_SGL→ Single Bedroom_LIV→ Living Room_COR→ Corridor
The reason for adding these codes is to allow automatic template assignment in IES.
Within IES, a custom VE script loops through all rooms in the model, reads the room name, detects the code suffix, and automatically assigns the correct IES TM59 thermal template.
Without this step, room templates would need to be assigned manually in IES as the gem just contains the raw geoemetry so its just an extra bit of time saved.
3. Honeybee Model Setup and GEM Export
After the room naming step, the geometry is converted into Honeybee Rooms.
Within Grasshopper we then:
- Assign window apertures to the Honeybee rooms
- Add external shading geometry and any adjacent buildings
Once the Honeybee model is correctly configured, it is exported to IESVE using the GEM format.
4. Import and Thermal Template Assignment in IESVE
After importing the GEM file into IESVE, the first step is assigning the appropriate thermal templates.
This is done using the custom VE scripts, which as explained above:
- Loops through all rooms in the model
- Detects the suffix code appended to each room name
- Automatically assigns the corresponding TM59 thermal template
5. Construction Assignment
Once the templates have been assigned, we apply the appropriate construction sets to the model.
These include:
- External wall constructions
- Roof constructions
- Ground floors
- Internal partitions
- Glazing constructions
These constructions are applied using standard IESVE workflows.
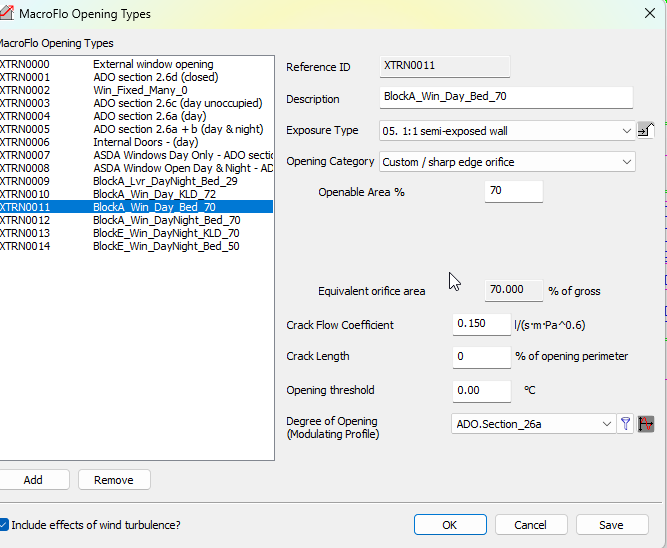
6.1 Macroflo Opening Type Setup
The next stage is setting up Macroflo opening types, which typically represents the most time-consuming step in this workflow.
This step determines how each window behaves in the natural ventilation simulation, including:
- Whether the window is openable
- Whether it is allowed to open at night vs day time operation only due to acoustic restrictions
- The effective openable area of the different window types in the model (for the windows that are openable)
6.2 Effective Openable Area Calculation
For openable windows, we calculate the effective opening area as a proportion of the full structural opening geometry which has been modelled/imported in IES.
This is done using an Excel spreadsheet provided by GOV.UK, which calculates the discharge coefficient (Cd) based on window geometry and opening type.
The workflow is:
- Input the window geometry dimensions, and opening configuration/angle into the spreadsheet
- Calculate the equivalent area (Aeq)
- Determine the ratio:
Effective Opening Ratio = Equivalent Area / Structural Opening Area
This ratio is then used to determine the effective openable fraction of the window area in IES.
To avoid generating an excessive number of unique window types, we attempt to rationalise these opening ratios across the scheme wherever possible.
6.3 Assigning Window Types in IES
Unlike Rhino, IESVE does not allow windows to be grouped using layers, which makes assigning window opening types more difficult.
To apply the Macroflo opening types we typically have to:
- Select windows based on area thresholds, or
- Manually batch-select windows
Both approaches can be cumbersome, particularly for large residential models with hundreds of windows.
6.4 Window Opening Profiles
One useful feature in IESVE is that Part O temperature-based window opening profiles are already built into the software.
These profiles determine how windows open as a function of internal temperature, which aligns with TM59 assumptions.
Because these profiles are embedded in IES, they do not need to be recreated for every project, which simplifies the setup process.
7. Simulation
Once:
- Thermal templates are assigned
- Constructions are applied
- Macroflo openings are configured
the thermal simulation is run within IESVE.
One of the key benefits of using IES for TM59 modelling is the very fast simulation time, even for large residential schemes, probably due to optimised algorithms and the parrelel processing that is available in the IESVE sim settings, I’m not sure…
For example, on one of our recent projects containing 1,553 rooms, the complete simulation took approximately 15 minutes to run, which is extremely efficient for a model of that size.
This rapid simulation capability allows for quick design iteration and testing of multiple scenarios, though this is still a bit of a pain in IES.
8. Post-Processing with Custom VE Script
After the simulation completes, the results are processed using another custom VE script.
This script:
- Extracts the relevant TM59 overheating metrics
- Organises the results by room
- Exports the data to a CSV file
This automated step avoids manual data extraction from the VE interface.
9. Results Visualisation in Rhino
The exported CSV results are then read back into Rhino/Grasshopper, where we generate visualisations of the results.
This allows us to present overheating performance in a clearer and more intuitive way, for example:
- Colour-coded room performance
- Overheating exceedance values
- Rapid identification of failing rooms
This Rhino-based visualisation is typically much clearer and easier to interpret than the native IES interface, particularly when communicating results internally or to design teams.
I’ve attached the Excel spreadsheet we use for the Cd (discharge coefficient) calculations, along with the old Grasshopper workflow script. We haven’t really touched the GH script (the one we were previously using to run the full TM59 simulation inside of GH), in a few months now since we moved the process into IES.
If you need any additional specifics, feel free to ask — I can also share screenshots of different parts of the workflow or UIs (e.g. IES or Rhino) if that would be helpful.
It would be great if we could eventually close the loop and avoid needing to go through IES altogether. However, in practice the simulation speed for large models, together with the level of control and granularity available in IES when modelling natural ventilation openings, ultimately outweighed what we were able to achieve directly in Rhino/Grasshopper. For that reason, we ended up transitioning the workflow into IES.
260108 Discharge Coefficient Calculator.xlsx (464.5 KB)
12-09-25 TM59 Script.gh (1.8 MB)